Domain Mapping in WordPress Multisite
A WordPress Multisite installation, as known, allows you to create and manage a network of subsites in a centralized way: each subsite is independent from the others but is still managed as a WordPress site, always within the main installation.
Up to WordPress 4.5, through an additional plugin it was possible to associate a top level domain to each subsite: this feature is called Domain Mapping.
Starting from version 4.5 Domain Mapping has been integrated into WordPress, so it is now a native feature and an external plugin is no longer needed.
Let’s check in the next sections how to set Domain Mapping in a WordPress Multisite.
Table of Contents
WordPress Multisite
The first step to perform, of course, is to create a Multisite Network. This means to install WordPress as Multisite, and not as Single site. More info on that topic are available here: How to install and set up a WordPress Multisite .
Also, for an overview on the Multisite environment, you can consider this tutorial: The WordPress Multisite Overview with Examples .
Within a Multisite installation you will be able to create as many subsites as you need: each of them will share the same database, and some dedicated tables will be created each time a new subsite is created.
If you want to dig more into technical database details you can refer to WordPress Multisite database tables explained.
Besides, during the installation, and only in that moment, you will be able to decide to create the subsites as sub domains or as sub folders.
For example, if your main site top domain is my-network.com, and you configured your Multisite installation to create subsites as sub domains, then you will be able to create new subsites as: site1.my-network.com, site2.my-network.com, site3.my-network.com and so on.
Instead, if you configured the subsite as sub folders, you will be able to create new sub sites as my-network.com/site1, my-network.com/site2, my-network.com/site3 and so on.
Domain Mapping: the roadmap
Now that your WordPress Multisite installation is up and running, in order to properly map the domains related to the subsites of your network we will proceed with the following steps:
- Configure DNS for the Domains
- Add the Domains to the WordPress Multiste hosting account
- Map each subsites in your Multisite Network to its related Domain
Of course, if you are in a live environment, before performing any change we strongly suggest you to create a backup of your site.
DNS System
When you write a domain name in your browser, the computer uses the DNS system to retrieve the actual address related to that particular domain.
In that way it can reach the system that hosts your site.
In order to relate your subsite with a domain you need also to properly update the DNS system.
But in case your hosting package provides the main domain for your site, the connection between this domain and the root of your network site should be already set.
Instead, if this is not true, and hence you registered the domains (both the main network site and the subsites) with a different provider, first you should properly connect the main domain to your network site.
This tutorial explains how to achieve that. After that, each subsite domain can be then similarly configured.
How this configuration has to be performed it could also be vary, depending on your particular hosting provider.
Check your hosting service documentation for further info.
DNS Configuration
In general, the information needed are the following:
- CNAME Record: this info maps an alias name to the domain name. Typically maps a sub domain such as www or mail to the primary domain hosting. For example, a CNAME record can map www.my-network.com to the domain my-network.com.
- A Record: this info maps a domain name to the IP address (IPv4) of the server hosting the domain.
- AAAA Record: this info maps a domain name to the IP address (IPv6) of the server hosting the domain.
- Nameservers: the hosting service provides these kind of info: Nameservers let you connect the domain with the Ip address of your hosting account.
When setting up your DNS, the info we describe here could be set in different ways depending on your hosting service. Also, you may not actually need and/or set all of them.
But in any case, after setting the DNS info, it will take from 24 to 48 hours before the changes take effect.
This is due to the DNS propagation time: the info that link your host to the referenced domains have to be set along all the required servers in the web before the routing of your site is properly managed.
Add Domain to Hosting
In this step we need to set our domain in the hosting account.
To perform this action you just need to add the domain to the Parked Domains or Alias lists. You can find them in the domains section in the interface provided by your hosting provider. One of these for example, is the CPanel application.
But in general, also here, settings depends on the particular hosting provider you are referring to.
After adding your domains to the Parked Domains or Alias, is then possible connect them to your subsites.
Let’s see how to accomplish that in the section below.
Map Domain to subsite
Now we need to map the domain to the related subsite in your Multisite Network. To do so you have to log into your WordPress back end and access to the Network Admin Dashboard.
From there, head to MySites -> Network Admin -> Sites and then in the subsite list select the one you want to map clicking on the Edit link.
Now you are in the sub site Edit page: fill in the Site Address (URL) field the domain you want to map.
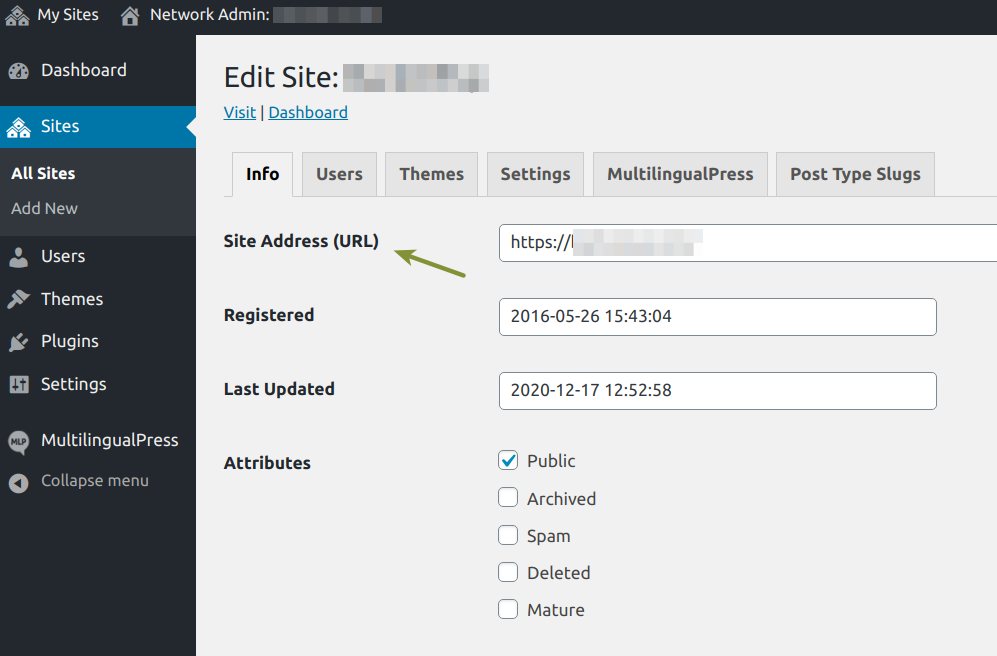
This way, WordPress will consider this sub site with the set custom domain, rather than the default sub domain or sub directory Url extension.
Install SSL Certificate
Finally, for security reason and SEO benefit, it is good practice to set an SSL certificate for each subsite. The SSL encryption in fact protects the communication.
Furthermore, the SSL protocol makes your site more reliable for search engines, which will consider that, and hence rank higher your sites in the Serp.
Again, SSL certificate could be provided by default by your hosting and its activation could vary depending on the provider.