As one of the biggest Content Management Systems (CMS) to date, WordPress is still growing rapidly — proven by the increasing numbers of websites running on the platform year after year.
Every day, there are hundreds of new websites built on WordPress. Today, it powers around 42.9% of all sites on the internet, 14.7% of which are the world’s top websites.
The 2022 WordPress statistics from Kinsta even report that WordPress has a 60.8% share in the overall content management systems market right now.
One of the WordPress’ top features that many people love is the WordPress Multisite Network released during the WordPress version 3.0 update in 2010.
The WordPress Multisite Network allows users to manage a couple, tens, or even hundreds of different websites in one WordPress installation and admin network.
All sites on the network will have access to the same basic features as the main site, like plugins or themes. But users can also customize each website to their liking.
Sounds like a great feature, right? However, many people think setting up a Multisite Network is challenging. If that’s what you’re thinking, you’re in luck!
In this article, we will be giving you a complete beginner’s guide on WordPress Multisite Network. You will learn what it is, its benefits, and how to set up and use it.
Let’s get started!
What Is WordPress Multisite?
WordPress Multisite Network is a built-in WordPress feature that allows users to create multiple websites under one network and administration.
Users can easily handle several and even hundreds of websites simultaneously with this tool. This includes managing existing features, plugins & themes, and also roles.
WordPress Multisite Network creates a network of subdomains or subdirectories for the main site. That’s why it’s perfect for businesses that manage multiple websites under one domain.
Here’s what a sub-domain site and sub-directory site under the WordPress Multisite Network would look like:
- Subdomain: subdomain.multilingualpress.org
- Subdirectory: multilingualpress.org/subdirectory
Who Needs WordPress Multisite?
Essentially, the WordPress Multisite Network can be used by anyone who wants to create a website in different languages. It is also used as a network for hosting different websites with less administrative effort.
Multisites can be used by any kind of website or online shop for various purposes. Such as creating multiple sites for their business branches & organizations, or displaying sites in different languages for their audience.
What Are the Benefits of WordPress Multisite?
What makes the multisite network so popular is that it comes with the same folder structure, basic files, and codebase as your regular WordPress installation.
Therefore, the Multisite Network is always available on a regular WordPress installation, even though it is not included in the installation by default.
That being said, you will need to configure some additional setups to be able to run a multisite network on your WordPress website.
No worries, though! While setting up a multisite network may seem like a daunting task, this article will guide you through it.
But before that, let’s take a look at the key differences between the regular WordPress installation and WordPress multisite!
Regular WordPress vs. WordPress Multisite
| Differences | Single-site WordPress | WordPress Multisite |
| Installation | One regular WordPress installation for one single website. | One installation for multiple websites. |
| Admin dashboard | One admin dashboard for one single website. | One main admin dashboard for all the sites in the network and one for each site. |
| Media storage | One folder for everything on the single site. | Multiple folders to store media for each site. However, you can also create a multisite global media network using a third-party plugin. |
| Plugins & themes access | The administrator will have complete access to all the plugins and themes on the website. | Only the network administrator can install and distribute the plugins and themes. Each site admin can activate or deactivate as needed. |
| Data Storage | Single-site WordPress has the same database for the entire website. | Multisite creates additional database tables for each site in the network. But it also stores some data such as users for the entire network. |
Why Should You Choose WordPress Multisite?
Now that you have a basic understanding of what a multisite network is, you must be wondering when and why you would need to use it on your WordPress website, right?
There are many reasons why many people prefer to use WordPress Multisite Network over the regular one. Here are some of them:
- Managing & hosting client sites: Instead of hosting ten different websites, installing a multisite network, and managing all client sites from one installation is easier and a lot cheaper.
- Company pages: It’s easier to use a multisite network to create the same websites in different domain names, especially for international companies whose websites are translated into different languages
- Multilingual sites: Multisite networks let users create many copies of the original websites, which is also good for multilingual sites. The easiest way to create a multilingual site is through a plugin like MultilingualPress.
- Product pages: When managing the products’ websites for the company, it’s more efficient to have them in one network instead of separate servers and hostings.
- Product demonstration sites: Developers can also use the multisite network to test their products and pages before releasing them live online.
Is WordPress Multisite Network Secure?
WordPress doesn’t have a built-in security feature by default. That said, users need to implement layers of protection themselves to ensure the best safety for their site.
But thanks to the extensive choice of security plugins and third-party solutions on the market right now, it’s now easy to secure a WordPress website.
Most website owners use Secure Sockets Layer (SSL) certificates to encrypt and secure communications between the web browser and the website.
For WordPress Multisite, it’s recommended to purchase and install a separate SSL certificate on each website in the network for a good security measure.
Other security means you can take to secure WordPress Multisite Network include doing regular backups, using the latest PHP version, and installing a firewall.
Advantages of WordPress Multisite Network
Before getting into how to create a WordPress Multisite Network, you might be wondering what benefits this multisite feature provides.
Here are some of the benefits of having a Multisite Network:
Super Administrator
The administrator is the highest role holder on a regular WordPress installation. In WordPress Multisite, the highest role holder is called the Super Administrator.
The Super Administrator can single-handedly manage the system for the entire network – which means you will only need one management system for all of your sites.
It comes with access rights to the Network Admin area menu dashboard, which serves as central access to various options for setting up all the WordPress multisites.
So with just one dashboard, the Super Admin can manage plugins & themes, create other users, and manage permission levels for all the sites integrated into the network.
Quick and Easy Access
With the super admin feature in place, the Super Admin in the multisite network can quickly access all the websites with just one username and password.
Moreover, it’s super easy to access all the websites too! The user needs to click on the drop-down menu on the top left of the WordPress dashboard called “My Sites.”
You will see a list of all the installed websites in the network. You can also hover over each site to access a quick menu such as Edit and so on.
Shared Plugins & Themes
Another great benefit WordPress multisite network offers is its shared plugins and themes.
In a WordPress Multisite installation, plugins and themes can only be installed by the Super Admin through the Network Area menu dashboard.
However, once enabled, the plugins and themes will be available and can be used on the individual sites on the multisite network by their respective admins.
Super Admins can activate everything directly through the network admin dashboard, or give site admins the freedom to activate as needed.
What’s more, when there’s an update, all the plugins and themes distributed in the network will be updated automatically once the Super Admin updates it on the Network area.
Automatic Updates
As explained before, the WordPress Multisite Network comes with a Super Admin feature that lets you manage everything in the network through one menu dashboard.
That said when there are any updates needed — whether it’s scripts, themes, plugins, or WordPress core files, Super Admin can automatically update it for the entire network.
So you don’t have to worry about having to update your sites one by one all the time! This saves a lot of time and effort, especially when managing hundreds of sites.
Creating a WordPress Multisite Network
Now that you know the common uses and benefits of Multisite Network, it’s time to learn how to create and set up a WordPress Multisite Network.
There are several steps involved in creating a multisite network. In this section, we will be explaining all the steps in detail to guide you through!
Step #1: Preparing Your Site for Multisite Installation
Before starting the tutorial, there are some things you should prepare beforehand, such as
1. Active WordPress Installation
To install and configure a multisite network, you will need an active WordPress installation on your web server.
Luckily, installing a WordPress website is pretty easy! Especially If you’re using a web hosting service. These services usually come with an auto-installer feature.
However, if you have your own web server, the WordPress.org official support also has detailed documentation explaining how to install WordPress yourself.
2. Deactivate All Plugins
If you already have a WordPress website running, chances are you’ve installed a few plugins to help you optimize and manage the site easily.
To successfully set up and create WordPress multisite network installation, you have to deactivate every plugin on the website temporarily.
This deactivation is done to prevent errors and incompatibilities in the plugins that might be a problem during the multisite installation.
Here’s how to do it:
- Log in to the WordPress dashboard and locate the Plugins menu.
- Open the Installed Plugins option to see a list of existing plugins on the website.
- Check the Plugin checkbox on the left side of the screen under Bulk Actions.
- Once all the plugins are checked, open the Bulk Actions drop-down > Deactivate.
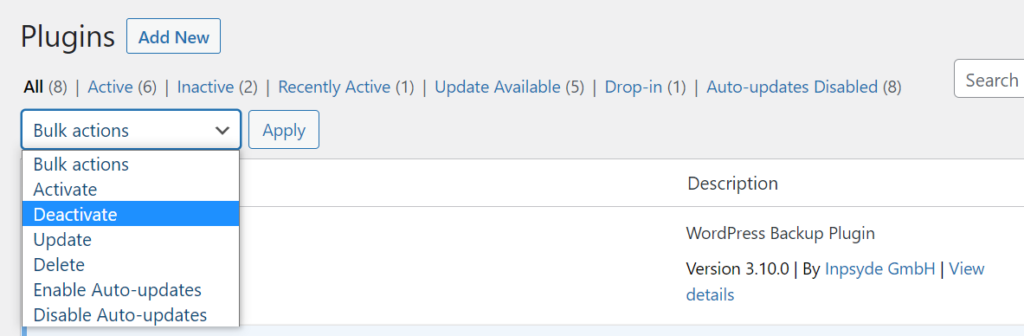
- Click on Apply, and all of your plugins should now be deactivated!
3. WordPress Directory Access
To allow and set up the multisite network installation, you will need access to the WordPress directory files on your webserver.
If you’re managing your own web server, you can use an FTP client like FileZilla or Cyberduck to set up a connection to your WordPress database.
If you haven’t done it before, here’s an official FileZilla documentation on how to get started. For hosting users, the WordPress directory files are in the File Manager.
4. Setup Pretty Permalinks
Before setting up your WordPress multisite network installation, you want to ensure you’re using the correct and proper permalink for the main site.
This is particularly important because WordPress uses the permalink setting / URL structure of the main sites to create other websites in the network.
By default, WordPress uses URLs like this http://example.com/?p=123. Not only that it’s not SEO-friendly, but this structure also looks ugly and messy.
Luckily, WordPress provides four pretty permalink options from which users can choose. Simply go to your dashboard and find Settings > Permalinks to access it.
There you will find all the pretty permalink options with different URL structures for your WordPress Multisite Network installation.
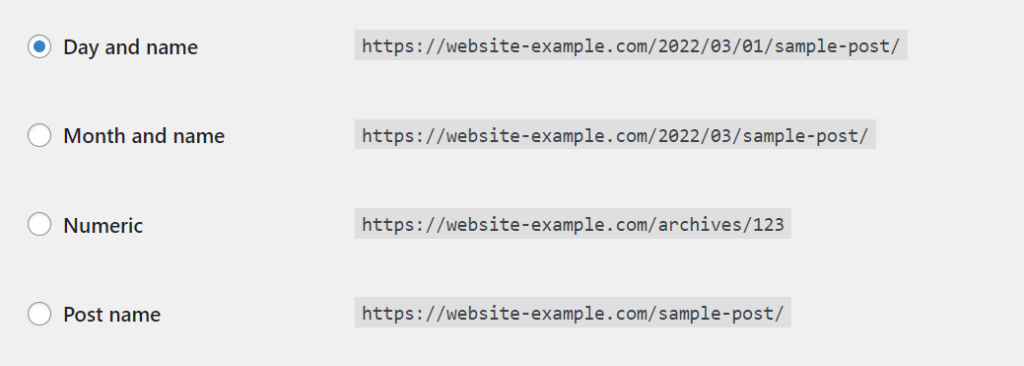
Choose one that fits the needs of your website. We recommend using the post-name option as YOAST recommends it as the ideal SEO-friendly solution.
5. Website & Database Backups
Before committing any changes to your WordPress website, it’s always a good idea to do a backup as one of the best security measures.
That way, in case something goes wrong during the installation, you can safely restore the website to its original state without any errors.
However, nowadays, thanks to a wide range of backup plugins, it’s pretty easy to do website and database backups on WordPress.
One of the best plugins to do so is the BackWPup — a straightforward plugin that lets you back up your files and database in just a few clicks.
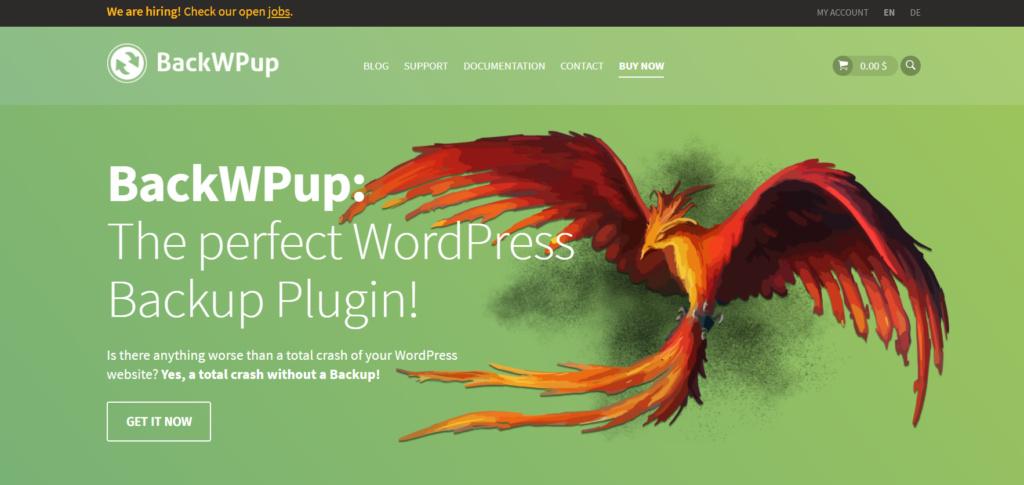
What’s more, you can use this plugin for free! All you do is install it on your site, let it do its job, and you can safely make changes to it.
Step #2: Allowing Multisite Configuration
If you have successfully done all the preparations in the previous steps, you’re now ready to install and enable WordPress multisite network.
The first step is to allow the Multisite Network configuration on your web server. To do this, you will need to access the wp-config.php file in the WordPress directory.
Set up a connection to your web server through an FTP client, open your website’s main directory, locate the wp-config.php file, and right-click to Edit.
Add this code snippet before the /* That’s all, stop editing! Happy blogging. */ line:
/* Multisite */
define('WP_ALLOW_MULTISITE', true);
Now Save the edits on the wp-config.php file, and you’ve successfully allowed the Multisite feature to be installed in your WordPress installation.
Step 3: Installing WordPress Multisite
Now that you’ve allowed the WordPress multisite configuration, the next step is to install the network on your website.
Luckily, it’s not hard to do! All you need is just a few simple clicks. First, refresh your browser and log in to your WordPress dashboard admin area.
Then, locate the Tools menu on the left sidebar of your dashboard and click on the Network Setup to configure the WordPress multisite.
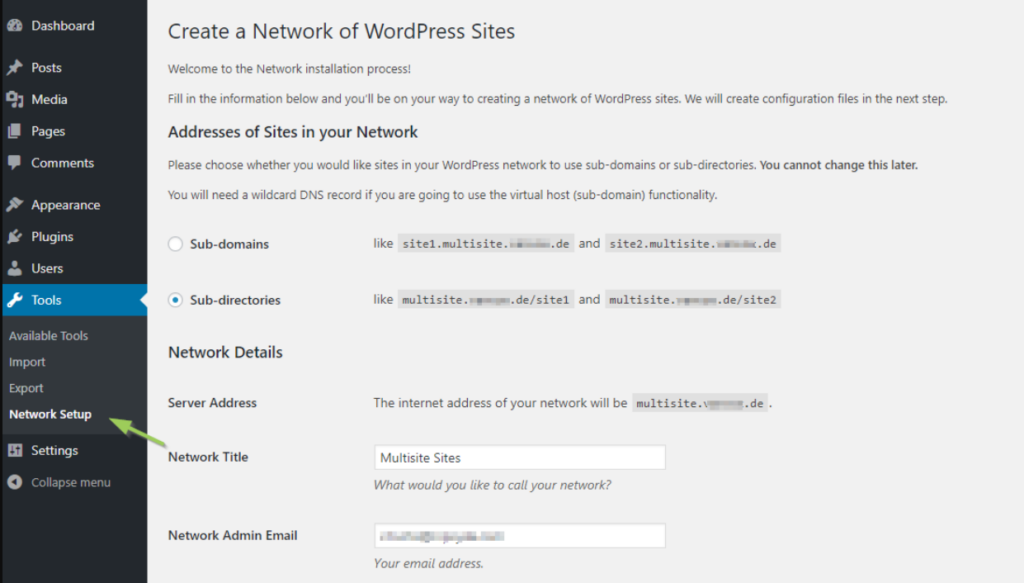
Now, decide whether you want to use subdomains like site1.example.com for the sites in your network or whether you want to have them installed in subfolders like example.com/site1.
This setting affects all the sites in your network and cannot be changed after. So, make sure to choose correctly. If you want to use a custom domain for the sites, you’ll need domain mapping.
Next, check your network details. These are usually filled in automatically, but you can also make changes as needed.
Here’s a short breakdown of each item in the detail
- Server address — address used to access your WordPress installation.
- Network title — the name/title of your multisite network installation.
- Network admin email — email of the person in charge of being a super admin.
Once all the details are correctly filled in, you need to click on Install, and WordPress will show you some code to enable the installation.
Step 4: Enabling WordPress Multisite Network
To enable the WordPress Multisite Network, you will need to copy and paste the code snippets shown during the installation to the wp-config.php and .htaccess files.
Setup an FTP connection to your server and connect to the WordPress directory.
Add these first code snippets to the wp-config.php above the happy blogging line and Save it.
define('MULTISITE', true);
define('SUBDOMAIN_INSTALL', true);
define('DOMAIN_CURRENT_SITE', 'My Website');
define('PATH_CURRENT_SITE', '/');
define('SITE_ID_CURRENT_SITE', 1);
define('BLOG_ID_CURRENT_SITE', 1);
Then, add the second code snippet to the .htaccess file in the same WordPress directory. Keep in mind to rewrite the existing WordPress rules in the file > Save.
Each network installation has different code snippets, so each website is different. However, the codes look similar to these:
RewriteEngine On
RewriteBase /
RewriteRule ^index\.php$ - [L]

# add a trailing slash to /wp-admin
RewriteRule ^([_0-9a-zA-Z-]+/)?wp-admin$ $1wp-admin/ [R=301,L]

RewriteCond %{REQUEST_FILENAME} -f [OR]
RewriteCond %{REQUEST_FILENAME} -d
RewriteRule ^ - [L]
RewriteRule ^([_0-9a-zA-Z-]+/)?(wp-(content|admin|includes).*) $2 [L]
RewriteRule ^([_0-9a-zA-Z-]+/)?(.*\.php)$ $2 [L]
RewriteRule . index.php [L]
Once you save all the edits, go back to the admin setup and click the link on the Network Setup page to log in to your newly installed WordPress Multisite!
That’s it. If you’ve followed all the steps in this tutorial carefully and correctly, congratulations, you’ve successfully created a WordPress Multisite Network!
Getting Started with Multisite Network
Now that you have enabled and installed the WordPress Multisite Network, it’s time to get to know the multisite network and configure its settings!
Once you login into the WordPress admin area, you will see a new menu called Network Admin on the upper left side of your admin area.
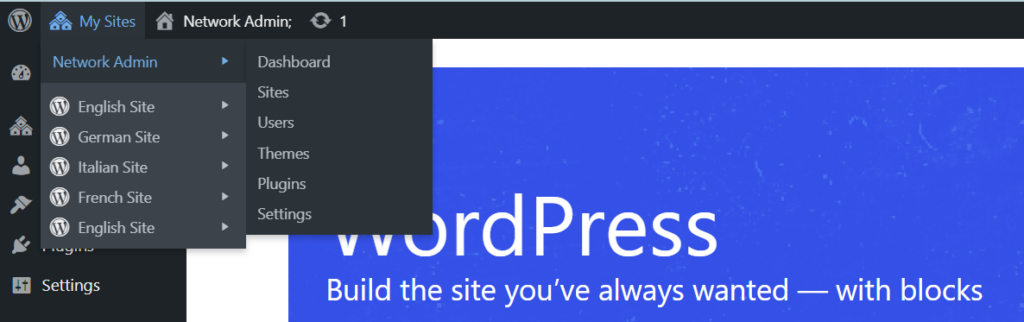
Here’s a short explanation of each item in the Network Admin menu:
- Dashboard — a place to manage your multisite network. You can do some upgrades and updates and add new users and new sites.
- Sites — where you can see the list of all the sites in your network. You can access menu items of each site by simply hovering over the site name.
- Users — a place to administer the users of your network. In contrast to a single site installation, you can assign the super admin user role.
- Themes — theme administration, here you can install and uninstall themes and activate or deactivate them for the whole network.
- Plugins — here, you can find all installed plugins. You can add new plugins or delete them. You can also activate or deactivate them for the whole network.
- Settings — a place to access all the basic settings for your site, such as the network name, admin email address, user registration, and so on.
Adding a New Site to the Network
One of the major benefits of a WordPress Multisite is that it allows you to create as many websites as you want for the network.
Here’s what you need to do:
- Log in to the WordPress area and go to My Sites on the top left corner of the page.
- Choose Network Admin from the menu bar and go to Sites > Add New.
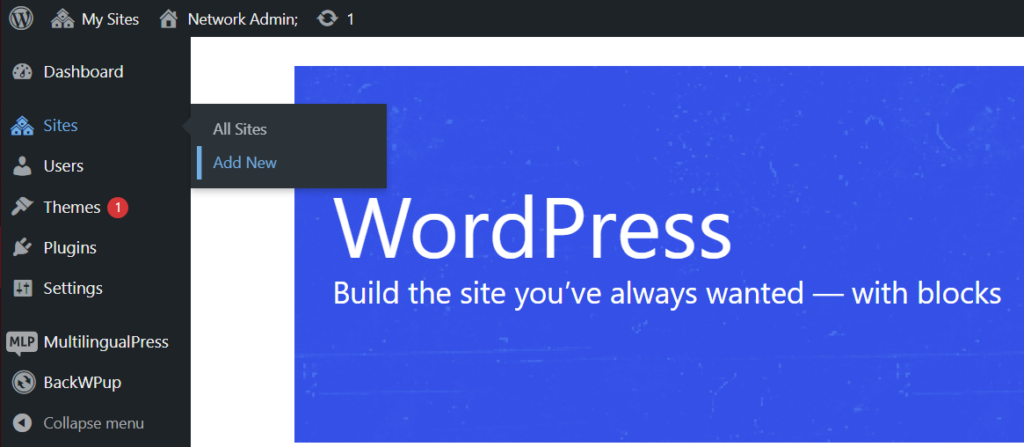
- Fill out and enter the site details as requested. Here’s the explanation:
- Choose how you want the URL address of your site to look with Site Address.
- Put in the name of your new website in the Site Title column.
- Choose the language you want to use in the Site Language drop-down menu.
- Put the email address of the site administrator in the Admin Email.
- Once you’re done filling in all the required information, click the Add Site button, and that’s it! Your new site should now be displayed under My Sites.
Pretty easy, right? All you have to do now is assign a user with an admin role to the new site and customize it the way you want!
Installing Plugins & Themes
As mentioned before, only the Super Admin can add and install new plugins or themes in the WordPress Multisite Network environment.
Super Admin needs to go to My Sites > Network Admin > Plugins page to manage the plugins. There, you will see a list of all the installed plugins in the network.
To activate the plugins for all websites in the multisite network, click on the Network Activate option under each plugin you want to enable.
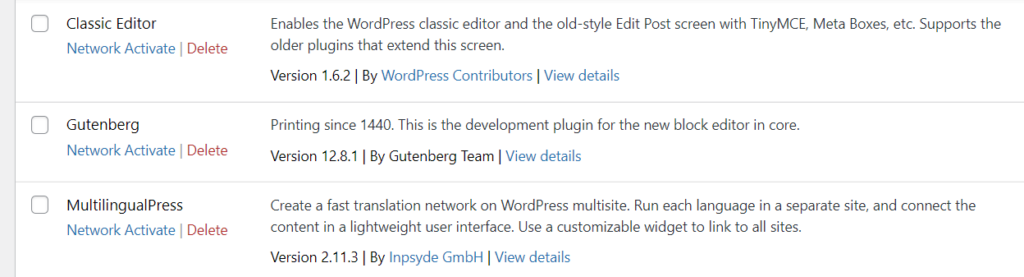
Themes management has the same process. You need to access My Sites > Network Admin > Themes. Click on the Network Enable to make it available for the network.
So, Should You Use WordPress Multisite Network?
WordPress Multisite Network is a great solution for businesses and organizations looking for a way to create and manage multiple websites under one management system.
Thanks to its super admin feature, it offers many great advantages, such as efficient network maintenance and easier site management.
The followings are the main benefits of WordPress Multisite Network:
- Access to many websites: create as many websites as you want under one main domain name and WordPress installation.
- Super administrator: single-handedly manages all the configurations for the entire network through one management system called the Network Administrator.
- Shared plugins & themes: the super admin can install, activate, and enable plugins and themes for all websites in the entire network.
- Quick and easy access: thanks to the Network Admin, the super admin can quickly access all the websites with just one username and password.
- Automatic updates: the super admin can automatically perform any updates & upgrades for all the websites on the main dashboard.
In this article, we have given you a comprehensive guide to WordPressMultisite Network. Starting with what it is, its differences from the regular WordPress, and how to create one.