As of January 2021, there are 4.66 billion active internet users worldwide. This fact alone makes the web one of the best places to grow your business and gain customers.
However, standing out and gaining an edge over other online businesses on the international market can be challenging. It takes a lot of hard work and effort.
One of the best ways to establish your business’s online presence and gain more customers on the international market is with a multilingual website.
Why? Even though English still takes up about 25% of the most commonly used languages on the internet, there are other languages on the top list.
Chinese and Spanish, for example. According to the latest report from Statista, these two languages make up around 27% of internet users combined.
Imagine if your business websites were available in these two languages as well. That would surely mean an increase in both the target market and traffic, right?
But what is a multilingual website, and how does it work? No worries! In this article we will be covering everything there’s to know about it.
Starting from what is a multilingual website, the benefits, factors to consider before starting it, and how to create one. Let’s get started!
What is a Multilingual Website?
As the name suggests, a multi-language or a multilingual wordpress website is a website in which content is translated into more than one language.
These websites are commonly used for online businesses and e-Commerce shops or websites trying to venture out into the international arena.
Benefits of a Multilingual Website
There are a lot of benefits one can get from having a multi-language website, such as:
Reach a broader and larger audience
A multilingual website has a great influence on expanding the reach of a business’s target market. You can make your products available in different parts of the world.
Increase business’ brand loyalty and trust
Most people are more comfortable buying products and using services in their local languages. That said, it’s easy to increase customers’ trust and loyalty with a multilingual website.
Attract more traffic to the website
You can translate all the website content into another language with a multilingual website.
That way, if you have one piece of content in four different languages, Google will index and rank it as four separate pieces of content.
You will have more chances of your content sitting on the top pages of search results (SERPs) and getting more traffic for it.
Increase conversion and sales
Product marketing can reach various countries and increase business profits with a website providing different languages.
Apart from targeting the local market, you can also use a multilingual website to attract buyers and potential customers from other countries.
This means every language added to the website has the potential to increase the conversion rate and sales of your business!
Decrease bounce rate
Bounce rate is the percentage of visitors who leave websites immediately without taking action after only opening a page.
Multilingual websites provide users with more language options, non-English speaking customers can opt to use their preferred language.
When the customers see a translation available, they will not leave the website immediately and ultimately decrease the site’s bounce rate.
Why Do You Need a Multilingual Website?
Now that you understand a little more about what a multilingual website is, the next question is whether it can bring value to your business.
First and foremost, a business website has one main purpose; to attract more people and generate leads (possible customers) for their services, products, or solutions.
A business website needs to cater to the needs of its target audience and potential customers to get more traffic and interactions.
What’s a better way than having a website translated into many different languages? After all, not all internet users are native English speakers.
Moreover, according to CSA’s “Can’t Read, Won’t Buy” research, about 65% of consumers prefer to read content in their languages despite not having the best quality.
On the other hand, Neil Patel, an SEO and internet marketing expert, had a traffic increase of 47% once he translated his website into 82 different languages in 2015.
While that example is pretty extreme, it shows how important and how well perceived a multilingual website is by customers all over the world.
So, to widen and reach a global scope for your business and drive more traffic to the website, you will need to create a multilingual website.
5 Easy Steps to Create a Multilingual Website
After knowing the benefits and advantages of having a multi-language website, you probably want to learn how to create a multilingual website.
Well, you’re in luck! In this article, we will guide you through the process of creating a multilingual WordPress website step-by-step.
There are some important factors to consider before getting all the benefits of a multilingual website, such as:
- How to choose the right plugins for the site.
- Which languages to use for the multilingual site.
- How to implement the correct multilingual SEO.
- What translation services to use for the site.
Luckily, we have written another article about multilingual WordPress website best practices to help you prepare your website.
Be sure to go over that article and apply all the necessary multilingual website practices before following this tutorial.
Once you’re all set, it’s time to start building!
There are several ways to go about creating a multilingual site. The easiest and most efficient way is through a WordPress multisite network.
WordPress multisite network is a WordPress feature that lets you create multiple different websites under one single network and administration.
You can create as many websites as you want in different languages and manage them easily under one WordPress installation with this feature.
What’s more, thanks to many multisite network plugin solutions like MultilingualPress, creating a new website in a different language now only takes a few minutes.
When creating a new site, the MultilingualPress plugin automatically translates the default WordPress content such as posts, pages, categories, tags, and taxonomies.
All you have to do is hire or use translation services to translate the rest of your website content into the designated languages! Pretty neat and simple right?
MultilingualPress also has other great features to create and manage a multilingual website, such as an intuitive language switcher, Yoast SEO sync, etc.
What are we waiting for? Let’s dive right into the multilingual website tutorial, shall we?
Step #1: Install WordPress Multisite
The WordPress multisite network is always available on any regular WordPress installation. However, it is not installed on the website by default.
There are some configurations and setups users need to do before they can run the multisite network and create multilingual websites, such as:
- Allowing the multisite configuration by adding codes in the WordPress directory.
- Installing the multisite network on the WordPress admin dashboard’s Network Setup.
- Enabling the multisite installation by adding code snippets to the .htaccess file.
Luckily, we have written a complete step-by-step tutorial on how to create and set up the WordPress Multisite Network before.
Go over to that article, finish the network installation, then come back to learn how to create your multilingual websites easily with MultilingualPress!
Step #2: Install MultilingualPress 3
As discussed earlier, the MultilingualPress plugin allows users to create and duplicate multilingual websites in under a few minutes.
It automatically duplicates the main website, translates the custom WordPress content, and connects posts from the base site to the desired language.
This plugin also allows users to create an intuitive and navigational language switcher link menu with flag icon, language, or both at the same time.
What’s more, as it has no lock-in effect, everything you create with it will stay the same whether the MultilingualPress is running on the site or not.
Even better? You can get all of these great features for only $99. It’s a pretty good deal if you consider all that comes with it!
How do we install and use MultilingualPress? It’s pretty simple! All you need to do is follow these steps:
- Visit MultilingualPress.org and scroll down to find all the license options.
- Choose one that best fits your needs. We recommend the Standard plan for personal uses and the Pro plan for a bigger project.
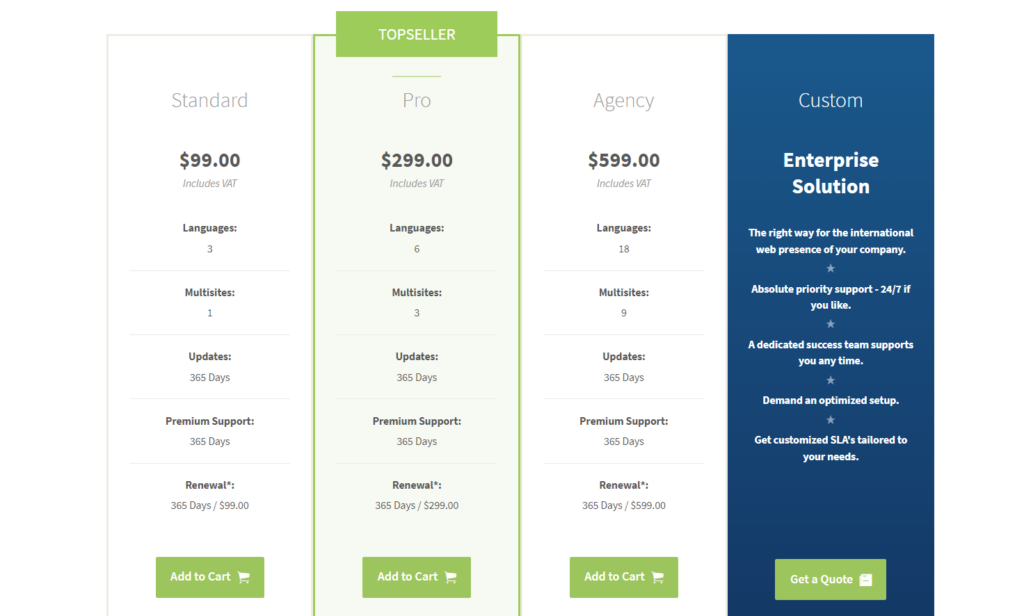
- Click on Add to Cart. Once the item is added to the cart, scroll down and press the Proceed to checkout button.
- Fill out all the billing details, add additional information, and choose a payment method. Then, click Buy Now.
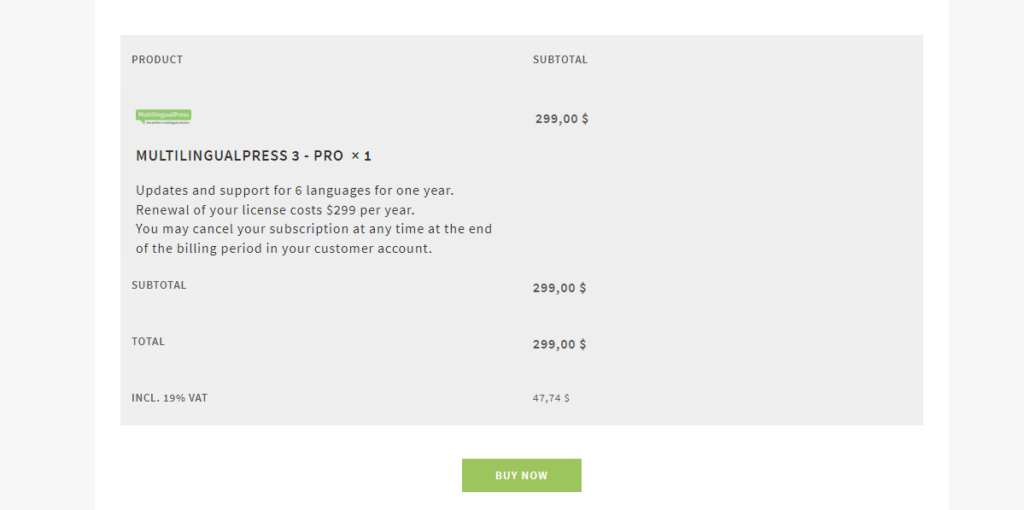
- Once the payment is complete, please log in to your customer account and download the MultilingualPress plugin.
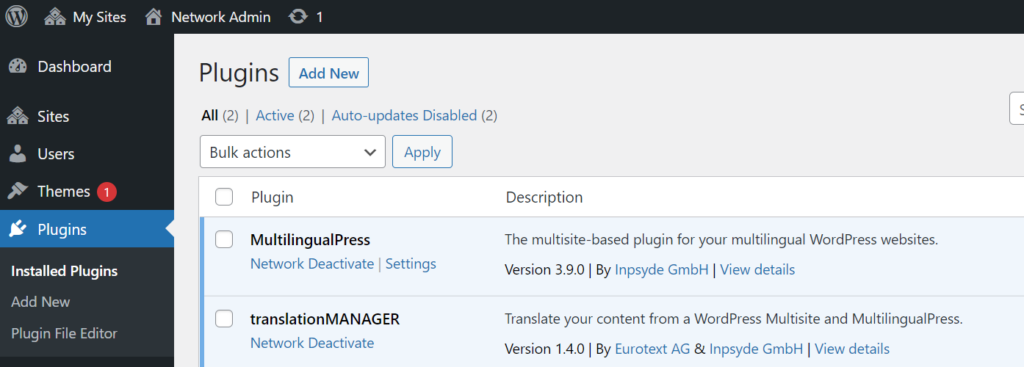
- Now, log in to the WordPress multisite network account and head to My Sites > Network Admin > Plugins.
- Click on the Add New button > and Upload the MultilingualPress plugin .zip files to the website. Then, Activate it across the network.
- Then go back to My Sites > Network Admin > Settings > MultilingualPress and choose the License tab.
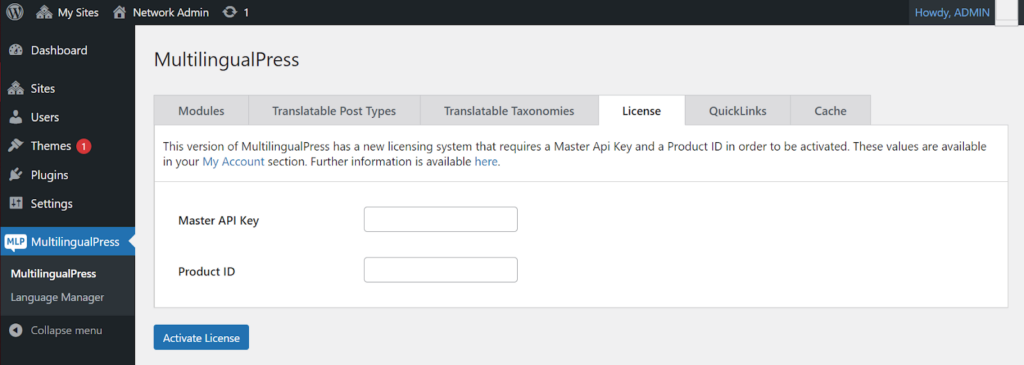
- Next, enter the Master API Key and Product ID that you can find inside the customer account and click on Activate License.
And that’s it! Your MultilingualPress plugin is now active and ready to be used to create multilingual WordPress websites.
Step #3: Setting Up MultilingualPress 3
Now that you have successfully installed and activated the MultilingualPress plugin, the next step is to set up the plugin.
To change the global settings of MultilingualPress, go to My Sites > Network Admin, then on the left menu, click on MultilingualPress.
Here, you will find six tabs with settings that apply to all sites. Two will only be available when the related modules of Redirect and Quicklinks are activated.
Here’s a short breakdown of all the features in each tab setting on MultilingualPress:
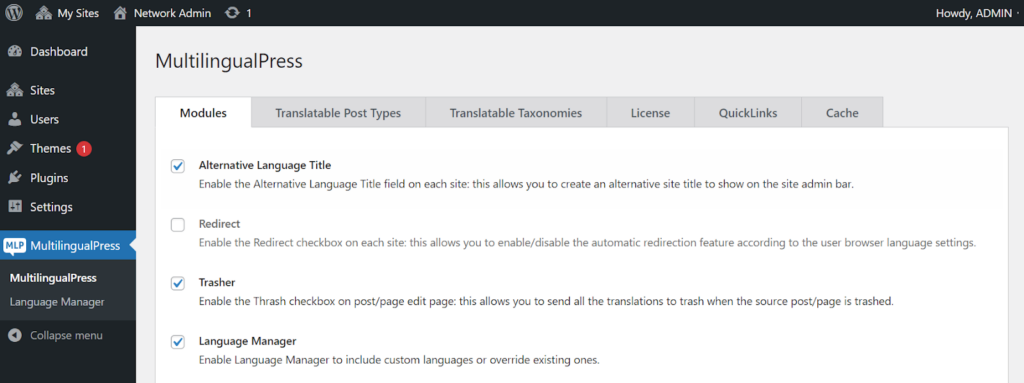
Modules
In this tab, you will find the following features of MultilingualPress:
| Feature | What it does |
| Alternative language title | Allows users to create an alternative site title to show on the site admin bar for each site in the network. |
| Redirect | Let users enable/disable the automatic redirection feature according to the user browser language settings. Keep in mind that this feature might also redirect Google bots from the websites and affect your SEO strategies. |
| Trasher | A checkbox shows, “Send all the translations to trash when this post is trashed.” Check this box to delete all translations of a post simultaneously when you move one of them to the trash. |
| Language Manager | Allows users to include custom languages or override existing ones. You can find the Language Manager under My Sites > Network Admin > MultilingualPress > Language Manager. |
| Language Switcher | Allows users to enable the Language Switcher Widget. This widget allows you to quickly include a language switcher in the locations set through your theme. |
| WooCommerce | This feature allows you to translate products, orders, and the typical product attribute such as product categories and product tags. |
| QuickLink | Shows links to translations in post content. This module enables the rendering of a link in the front end for each post-translation. |
| ACF | Enables Advanced Custom Fields (ACF) Support for MultilingualPress. Through this module, MultilingualPress will be able to manage these fields correctly. More info is available here. |
| Beaver Builder | Activates the Beaver Builder Support for MultilingualPress. |
| Elementor | Enables Elementor Support for MultilingualPress |
| User Information Translation Settings | This module enables the translation of the “Biographical Info” field available in the user profile section of WordPress.When activated, it’s possible to add a separate translation for the “Biographical Info” for each language available in the Multisite. |
| MultilingualPress Site Flags | Enable Site Flags for MultilingualPress. This module lets you automatically add the language flags to your menu. When activated, it also creates a flag-style menu to select and a custom site flag menu to add an image URL of a custom flag. |
| WooCommerce Brands | Allows WooCommerce Brands Support for MultilingualPress. |
Translatable Post Type
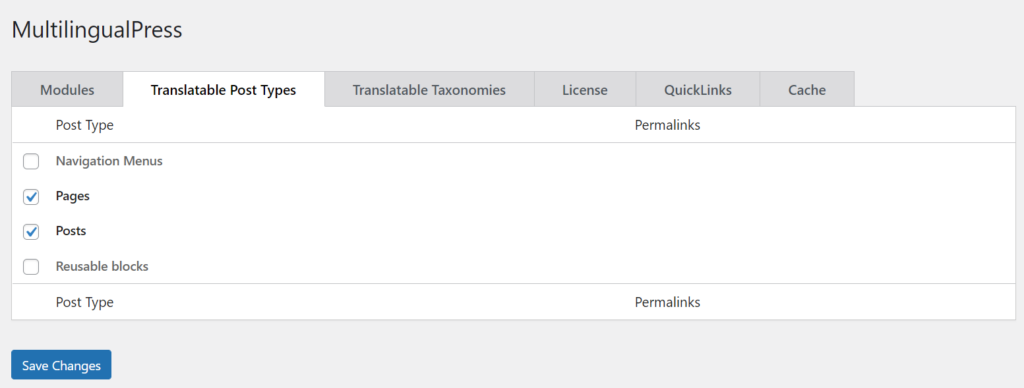
MultilingualPress users can choose amongst all the content/post types they want to translate into other languages- select types based on your needs and preferences.
The corresponding boxes will be available for the post types during editing. If you only select Posts, you will only be able to link content in different languages for posts.
Translatable Taxonomies
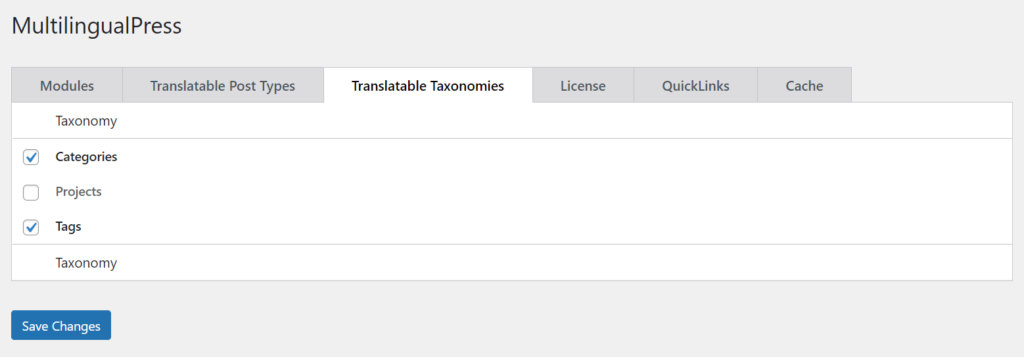
This tab works just like Translatable Post Types, but for the WordPress taxonomies. These taxonomies include categories, tags, and projects.
Cache
All the options, such as API, Database, and Navigation menu in the Cache tab, allow users to enable or disable the MultilingualPress cache components selectively.
In general, cache improves the plugin’s performance. But in case it creates conflicts, it is possible to select and disable all or only some of the components.
Step #4: Create Your Multilingual Website
Now that you have installed and set up the MultilingualPress, it’s time to learn how to create multilingual websites!
Luckily, it’s pretty simple! All you need to do is log in to the multisite network, head to My Sites > Network Admin > Sites and click on the Add New button.
On the next page, you need to fill in all the required fields with the appropriate information like the site’s title, site language, admin email, etc.
As you scroll down, you will see the MultilingualPress additional options, such as
- Language. Choose the language into which to translate. MultilingualPress offers more than 800 languages from which to choose.
- Relationships. The websites you would like to link with the new site. You can choose all or only select a few of the websites in the network.
- Based on site. Select which website is the main one. An exact copy of this website will then be generated along with its content and configurations.
- Copy Attachments. If the option is checked, all the attachments of the source site will be copied to the destination site.
- Connect content. Enabling this option means the new site will have all the content connected with the source/main site.
- Search Engine Visibility. Check this box to prevent search engines from indexing the newly translated website.
- Custom Site Flag. Use this box to add a URL image of a custom flag for the new site.
- Menu Language Style. Select whether to show only flags, only languages, or both in your language switcher menu.
Choose and set up each configuration based on your needs, click on Add Site, and congratulations, you’ve successfully created your multilingual website!
Step #5: Translate and Link Content with MultilingualPress 3
All there’s left to do is translate and link all content/posts within your multilingual websites with MultilingualPress 3.
MultilingualPress has different ways of translating content types and translating taxonomies. Here’s a detailed tutorial on how to do both:
Translating sites and posts
To translate content types( posts, pages, sites, and products), head over to one of your posts and content > Edit post.
Next, scroll down and find the MultilingualPress meta boxes. Here you can translate the post you’re editing into other languages.
You will see one meta box per language. This box sets up connections and translations between content in other languages.
Each box includes 5 tabs: Relationship, Title and Content, Excerpt, Advanced, and Taxonomies. Here’s a short explanation of each one:
Relationship
Here users can connect the post’s content they’re editing to the language written in the box.
In this tab, you will get three options:
- Not connecting and choosing any translation.
- Creating a new post to translate the content.
- Setting an existing post as the content translation.
Title and Content
In this tab, you can enter the title and content of the linked post.
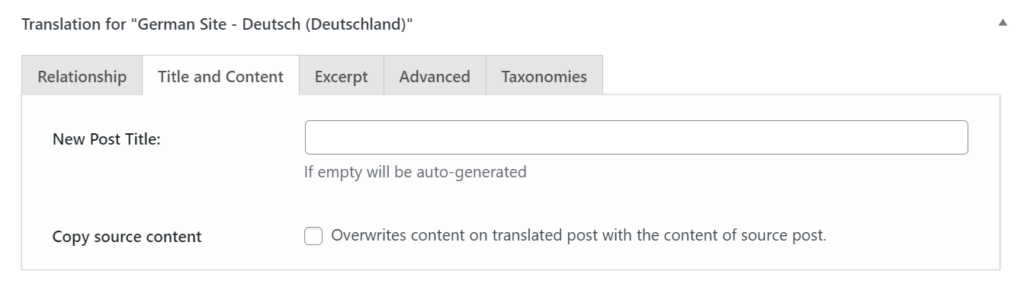
If you check the box next to Copy source content, this will overwrite the current content of the translation post with the main source content.
Excerpt
As the name suggests, this tab is used to enter a translated excerpt of the target language for SEO purposes.
Advanced
In the Advanced tab, you can specify the URL (Post Slug) and Post Status (published, draft, pending) of the new translation.

Here you can also copy the featured image from the original post and click on a link that opens the Edit mode of the translation post.
Taxonomies
Here you can specify taxonomies (e.g., categories, tags) for the translation.
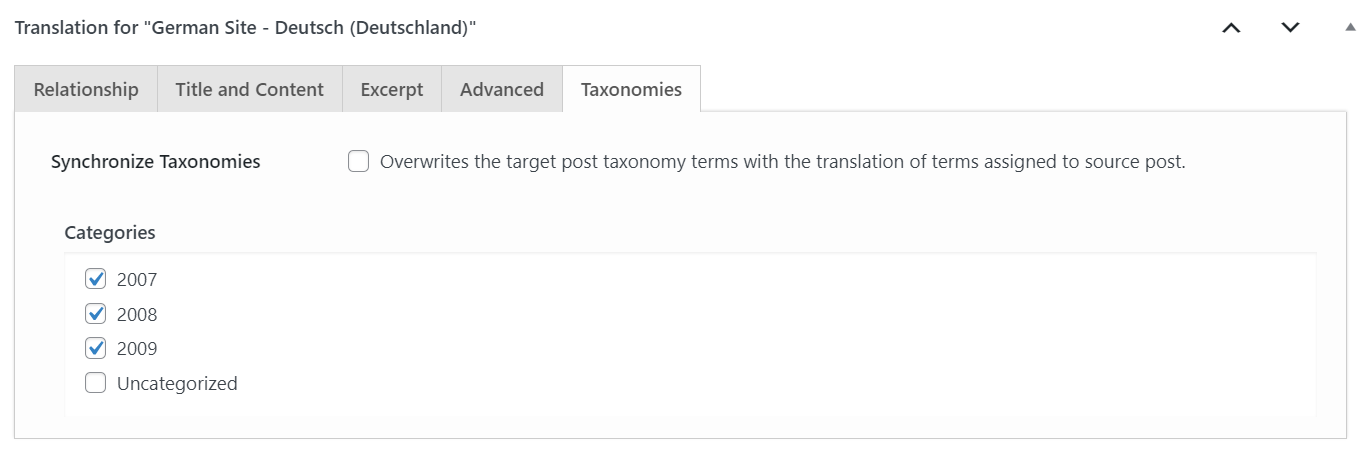
Enabling the Synchronize taxonomies overwrites all existing taxonomies in the translation with those from the source post.
Translating taxonomies
Taxonomies categorize or group together content in WordPress. The most common taxonomies are categories and tags.
However, there are also custom taxonomies that are supplied by plugins. WooCommerce product features, for example.
To translate your taxonomies with MultilingualPress, log in to the multilingual website and head to either the Tags or Categories menu.
Click on the item to translate and choose Edit. You will see the MultilingualPress translation boxes below the editor on the next page.

The taxonomies translation meta boxes have only two tabs: Relationship and Term Data. Here’s what they mean:
| Relationship | In this tab, you can specify the language connection between taxonomies. To create a new tag, visit the Term Data tab to define the term attributes before saving. |
| Term data | Here you can enter the term name, term slug, and a term description in the target language. |
That’s it! All you have to do is enter your preferred settings for the language connection in the tabs and then Save or Update the post.
MultilingualPress will then create the exact copies of the posts and taxonomies based on your setups, and you can begin the translation process!
Wrapping Up!
There you have it! This article has covered everything you need to know about multilingual websites. Starting from what it is, its benefits, and how to create one.
In general, having a website translated into many different languages is very important and beneficial for businesses for many reasons. Some of its advantages include:
- Attracting more traffic to the website
- Increasing conversion rates and sales
- Reaching a broader audience
- Decreasing the site’s bounce rate
- Increasing customers’ loyalty & trust
Thankfully, nowadays, creating a multilingual website isn’t so hard anymore, thanks to many cost-effective solutions like MultilingualPress.
This WordPress extension allows users to create an exact copy of your website in different languages through a Multisite Network with only a few clicks.
What do you think? Are you ready to create a multilingual website and take your business to the next level? We hope this article will help you get started.