Would you like to create a multilingual website quickly and easily? MultilingualPress (MLP) is the perfect choice.
Table of Contents
What exactly can MultilingualPress do?
MultilingualPress establishes language connections between various pages on a WordPress multisite. This enables you to display content to your website visitors in their language. To do so, you set up each different language version of your website as a site within a WordPress multisite. Then, you link the translated content using MultilingualPress. Content can include posts, pages, custom post types or even so-called taxonomies. This last designation includes categories and keywords, for example.
Our plugin also helps you forward website visitors to their appropriate language versionand automatically assists you with search engine optimization for your multilingual website.
Is there a demo version of MultilingualPress 3?
Yes! If you want to see what MultilingualPress 3 can do before buying it to make sure our product is right for you, please visit our demo site demo.multilingualpress.org. We have set up a multilingual site there with WooCommerce Shop. If something is missing or you have any questions, feel free to contact us at support@multilingualpress.org.-->
Check out our MultilingualPress video
Do you prefer watching a video instead of reading a long text? Do you want to know what MultilingualPress looks like in the backend and see how easy it is to use before buying? Take a look at our product video here.
If the video did not answer all your questions, please continue reading on this page or contact us.
What are the requirements for using MultilingualPress?
To install MultilingualPress, you need:
- An installed version of WordPress Multisite with WordPress >= 4.8
- PHP version >=8.0
If you don’t have WordPress Multisite yet, please follow our guide Installing and setting up WordPress Multisite. You can find more tutorials for WordPress Multisite in our guide WordPress Multisite 1×1.
Installing MultilingualPress
- After you have purchased MultilingualPress, please log in to your customer account and download the product.
- Go to My Sites → Network Admin → Plugins, upload the plugin, and activate it across the network.
- Then go to My Sites → Network Admin → MultilingualPress and enter your Master API Key and Product ID in the License tab. These can be found in your customer account.
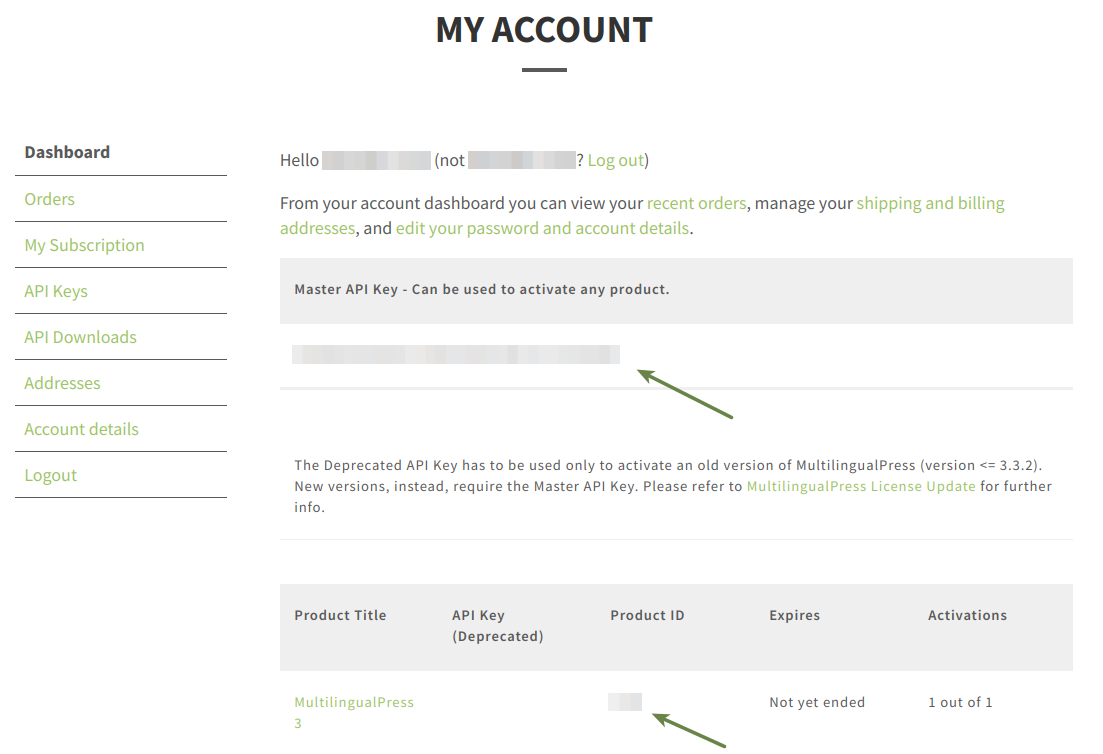
MultilingualPress license data and product download in your customer account 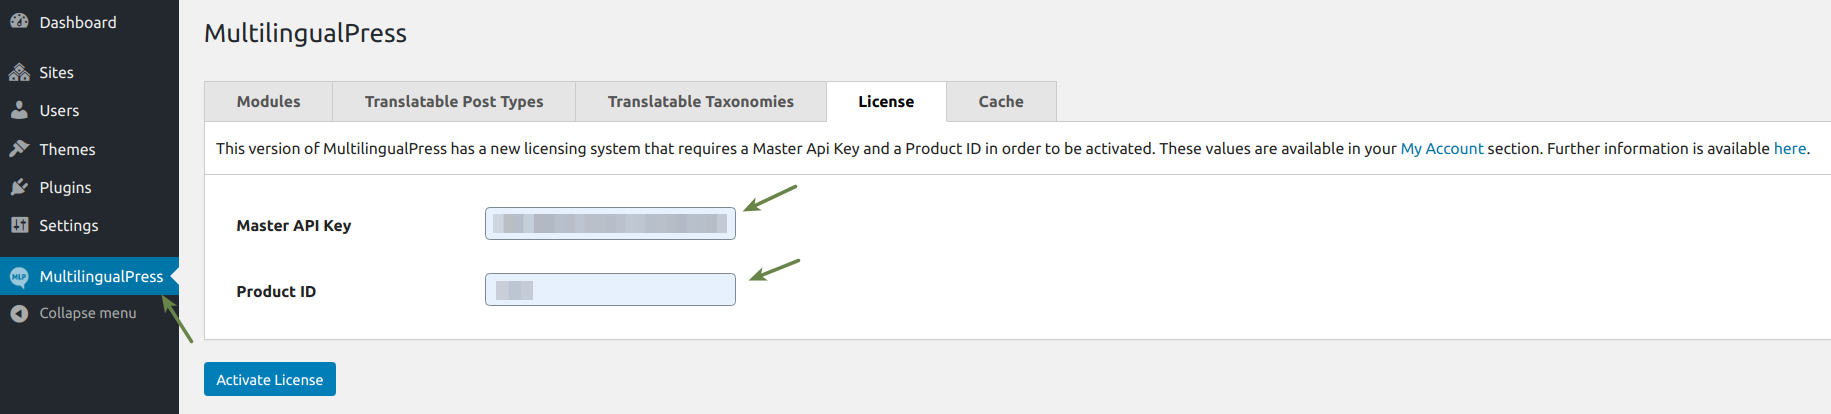
Activate your MultilingualPress license
Global settings for MultilingualPress
To change global settings, go to My Sites → Network Admin, then click on the left menu on MultilingualPress. In addition to the License tab, you will find here six tabs with settings that apply for all sites. Two of these tabs will be available only when the related modules Redirect and Quicklinks are activated.
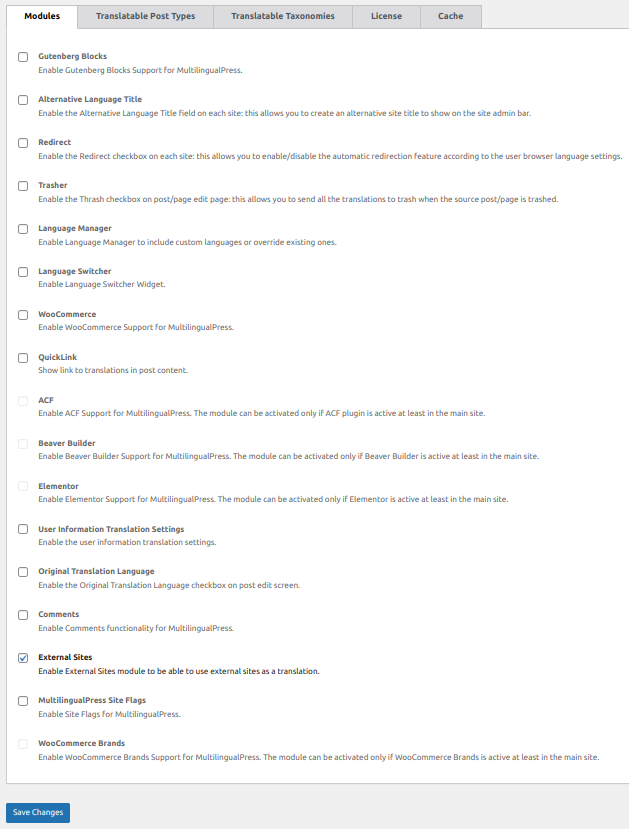
- Modules – On this tab, you can activate or completely deactivate MultilingualPress features:
- Gutenberg Blocks:activates the support for the MultlingualPress blocks.
- Alternative language title: activates the feature “Alternative language title”. If you check this box, a field for the alternative language title will appear on the MultilingualPress settings page for the website in question. This will be displayed in the Admin menu instead of the website title that was set when the site was created.
- Redirect: activates the feature for automatic language redirection. When this module is enabled a new tab “Redirection” will be activated. Further information is available below, on the Redirection tab description.
When this module is enabled, on the MultilingualPress settings page of the subsite (available when a new subsite is created or edited), two fields are available: the first to activate the automatic language redirection, the second one to specify if the current subsite has to be used as a fallback for the root language set.
That means, for example in the case of Italian root language used in two subsites, that: if site A has Italiano(Italia) language and site B has Italiano(San Marino) language and site A has the Redirect Fallback site for this language option checked, any customer who tries to access an Italian version which is not Italia or San Marino kind, is automatically redirected to the subsite A.
Further information is also available at: MultilingualPress release 3.9.0.
Settings for each site – Checkbox for alternative language title and checkbox for automatic redirect - Trasher: if this checkbox is activated, when editing a post, in the “Publish”meta box a checkbox will be displayed saying “Send all the translations to trash when this post is trashed.” Check this box to delete all translations of the post simultaneously if you move one of them to the trash.
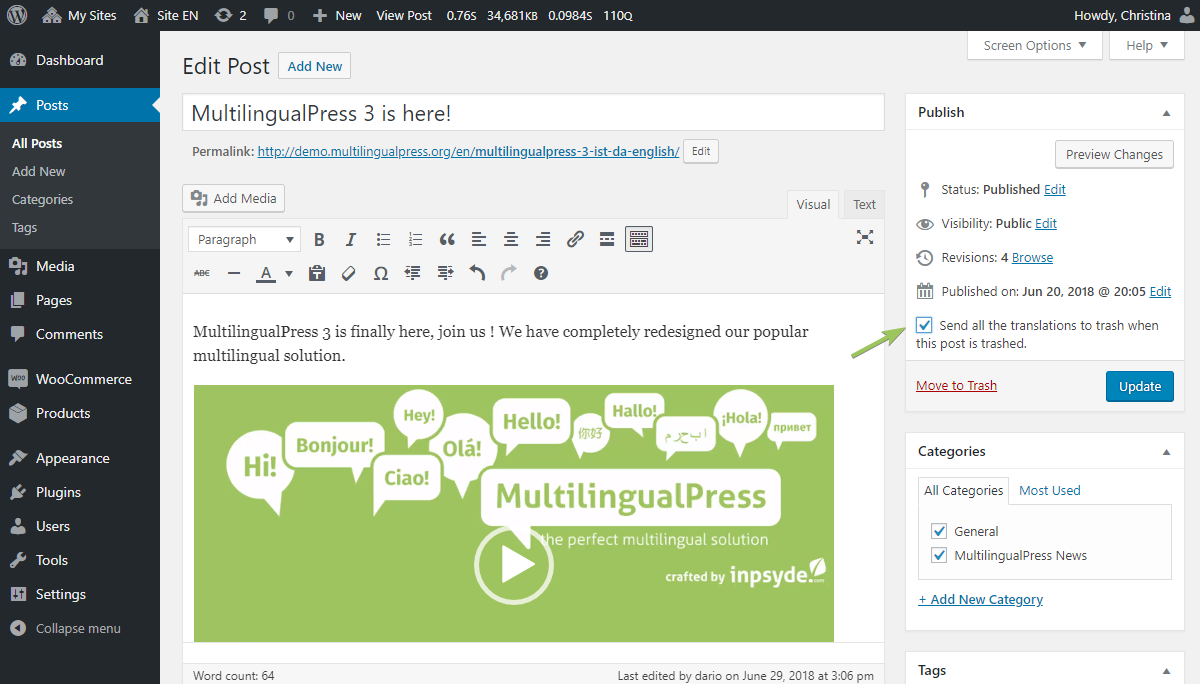
Activate the MultilingualPress Trasher checkbox to move all translations of a specific post into the trash simultaneously. - Language Manager: This enables the Language Manager, which allows you to include custom languages or override existing ones. You can find the Language Manager under My Sites → Network Admin → MultilingualPress → Language Manager. Click the New Language button to add a new line for a language to be added and enter your preferred settings in the fields. You can also search for an existing language and adapt it.
- Language Switcher: This enables the Language Switcher Widget which allows you to quickly include a language switcher in the locations set through your theme.
- WooCommerce: This module enables WooCommerce support and allows you to translate WooCommerce products, orders and coupons but also the product attributes typical to WooCommerce (product categories and product tags).
- Quicklink: This module enables the rendering of a link in the front end for each post translation; a dedicated tab section is available to set the position of the links.
- ACF: This module can be enabled when the plugin Advanced Custom Fields is also installed and activated in the Network. Through this module MultilingualPress will be able to manage these fields correctly. More information are available here
- Beaver Builder: This module enables the compatibility mode between MultilingualPress and Beaver Builder, in order to enable compatibility with this Page Builder plugin. Further information is available here.
- Elementor: This module enables the compatibility mode between MultilingualPress and Elementor, in order to enable compatibility with this Page Builder plugin. Further information is available here
- User Information Translation Settings: This module enables the translation for the field “Biographical Info” available in the user profile section in the WordPress backend; when active, is possible to add a separated translation for the “Biographical Info” for each language site available in the Multisite.
- Original Translation Language: This module enables a checkbox that can be used, when editing a post, to specify if the content is the original one or instead is just a translation of another post.
- Comments: This module enables the support for comments, more information is available here: MultilingualPress Comments support.
- External Sites: This module enables the support for external sites, more information is available here: MultilingualPress External Sites support.
- MultilingualPress Site Flags: This module lets you automatically add the language flags into your menu. When activated, it also renders, when a new site is created, a flag-style menu (Menu Language Style) to select and a field (Custom Site flag) used to add an image URL in order to display it as a custom flag for the current site.
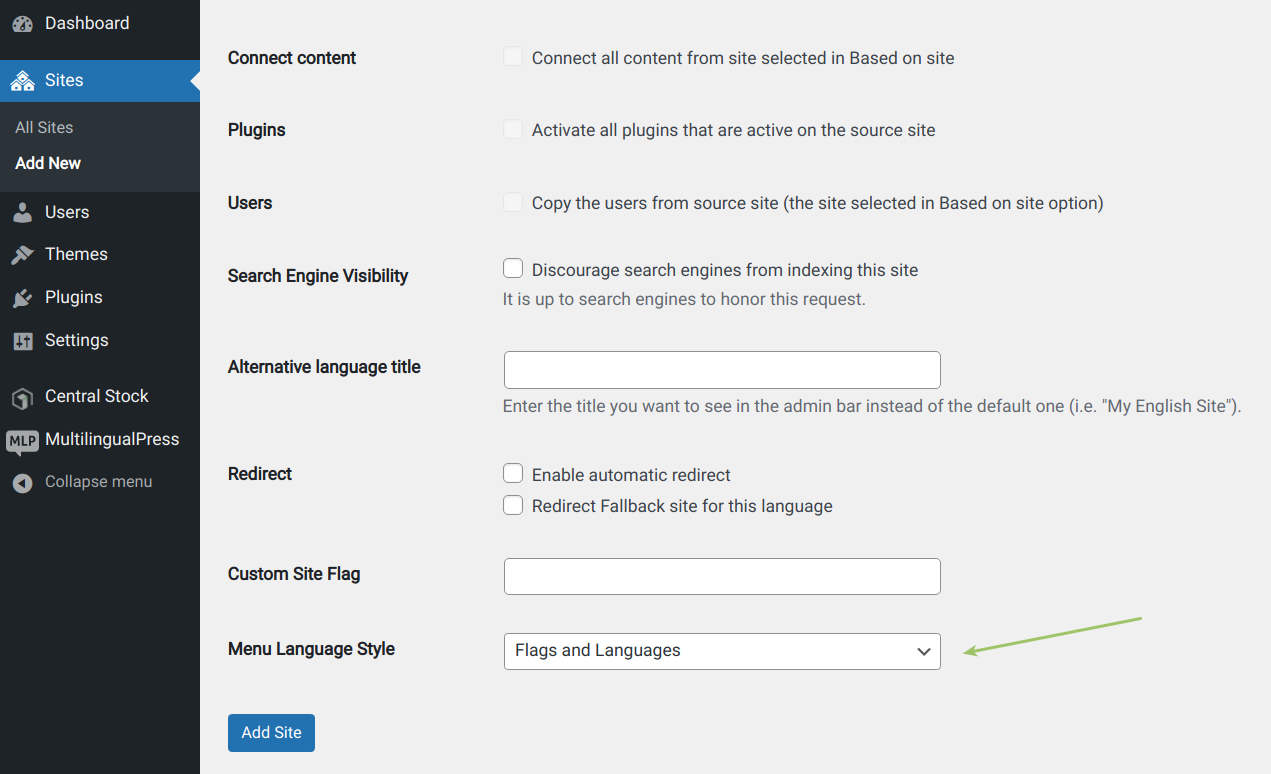
Style the flags menu - WooCommerce Brands: This module enables the compatibility mode between MultilingualPress and the Woocommerce Brands plugin, in order to avoid a taxonomy slug conflict. Further information is available here
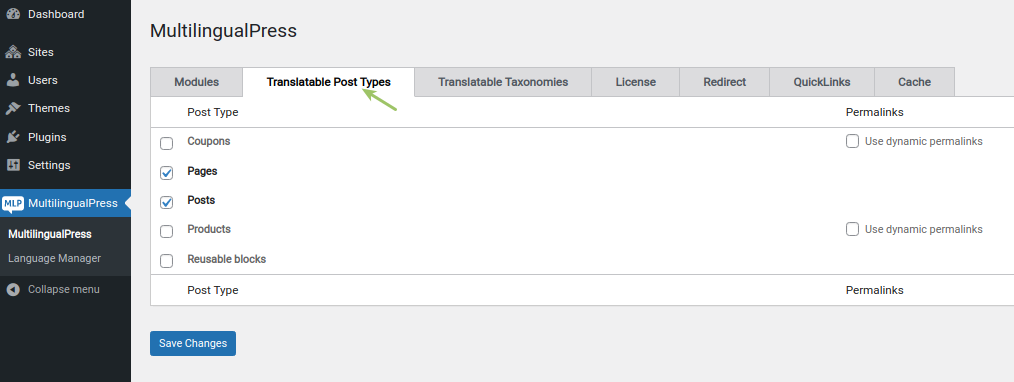
- Translatable Post Types: All content types (post types) are displayed here for which MultilingualPress can create a language relation. Select the type of your choice. The corresponding meta boxes will only be available for this post type during editing. For instance, if you only select Posts, then you will only be able to link content in different languages for posts.
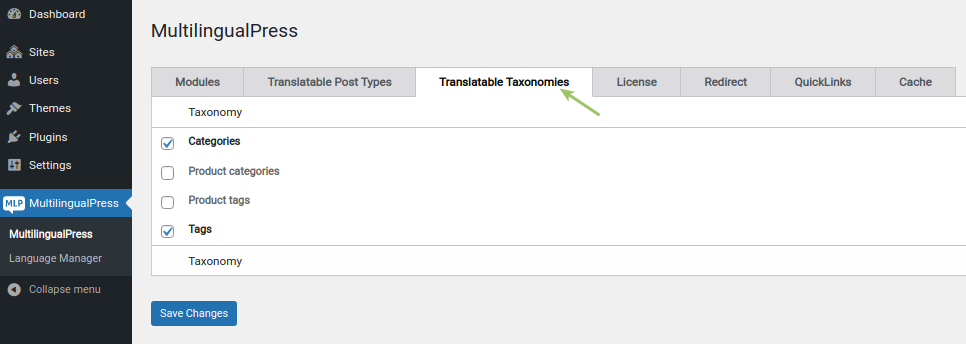
Set translatable content types with MultilingualPress - Translatable Taxonomies: Like Translatable Post Types, but for taxonomies. Taxonomies include for example categories or tags.
- Redirect: This tab is enabled only when the related option module is checked in the Modules tab.
Here, you find three select boxes:- Redirect Fallback: is a network site where the user is directed in case his/her language is not available in any of the sites set in the network
- Redirect Execution: this is the programming (PHP or JavaScript) language that will be used for the redirection
- Redirect Type: this lets you choose how the redirection should work. We have three options:
-
- Browser language (Header): the redirection is performed by detecting the browser language and redirecting the user to the related country site if it exists, to the fallback site if it exists, or no action will be performed
- Geolocation (IP Address): the redirection is performed by detecting the IP address of the visitor and using the geoplugin service will detect the country and will redirect to that country site if it exists, otherwise to the fallback site, or no action will be performed
- Geolocation with fallback to browser Language: the redirection is performed by detecting the IP address of the visitor and then using the geoplugin service will detect the country and will redirect to that country site if it exists; otherwise, it will default to the first option (Browser language)

-
- QuickLinks: This tab is enabled only when the related option module is checked in the Modules tab.
The four radio buttons here let you select the position of your quicklinks related to the content of the post. The links to the translation will be available only if some content exists in the related translation post linked.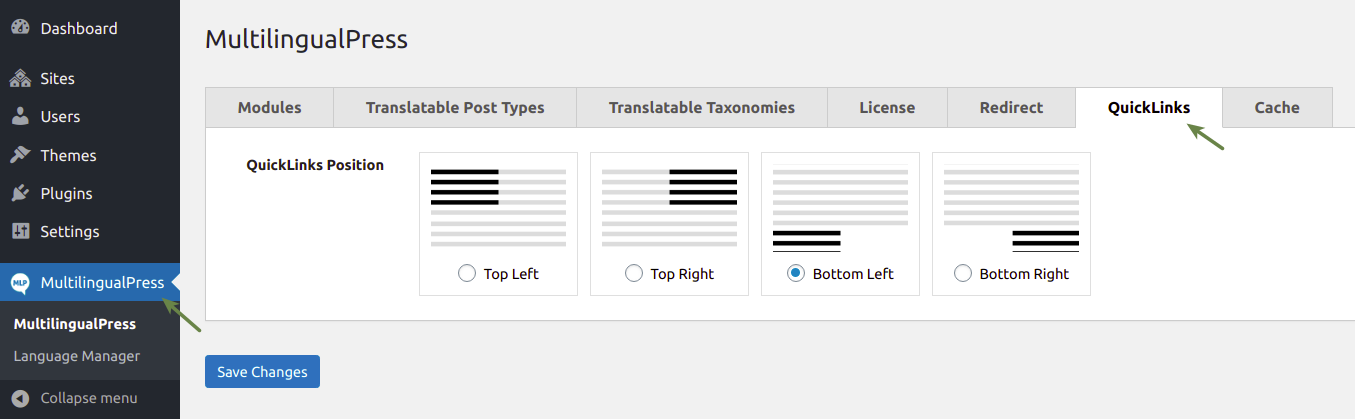
MultilingualPress QuickLinks - Cache: This option lets you enable or disable selectively the MultilingualPress cache components. Cache helps in improving the plugin performance. But in case there are conflicts with the server cache and/or with other plugins, it is possible to select and disable all, or only some, of the components.
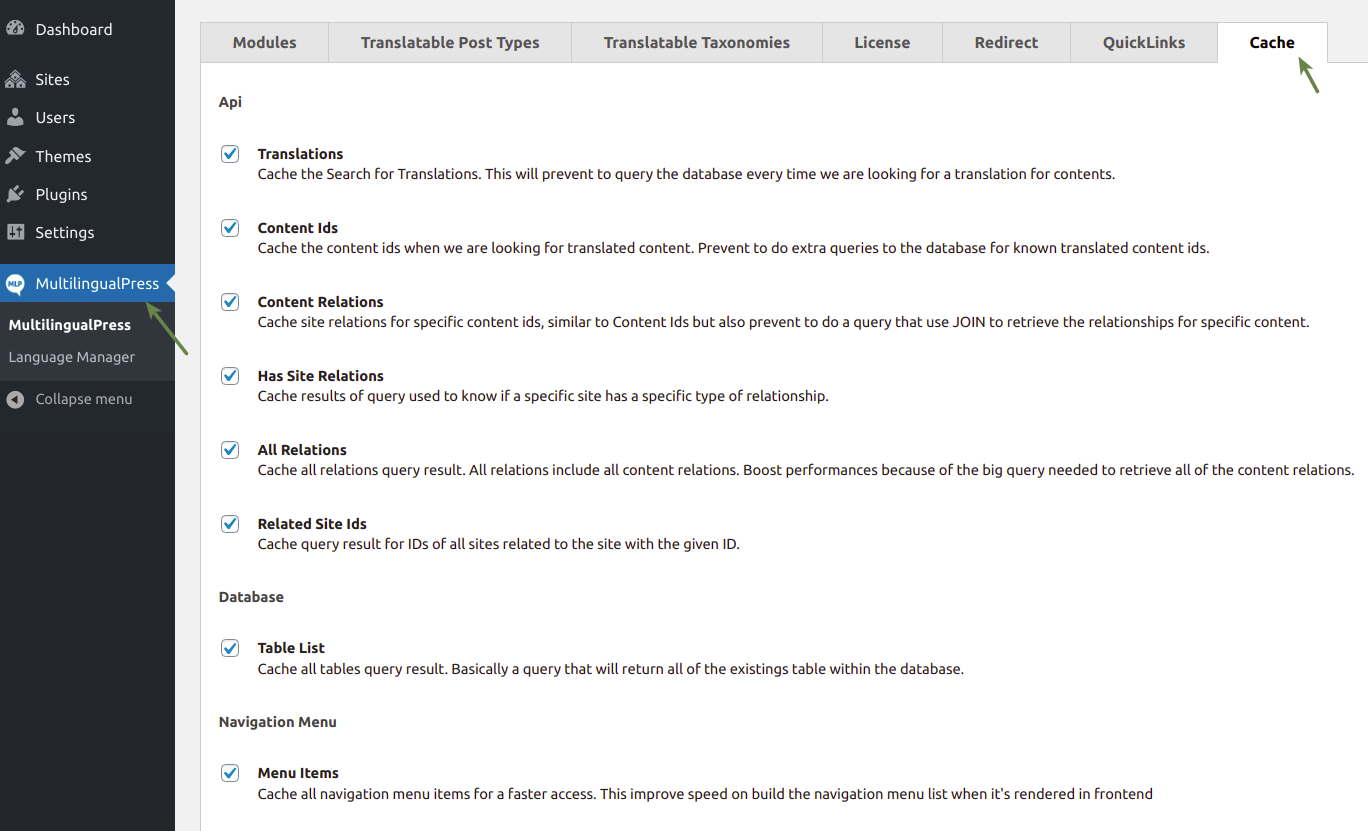
MultilingualPress cache options
Create a new website within the multisite and set the language for the site
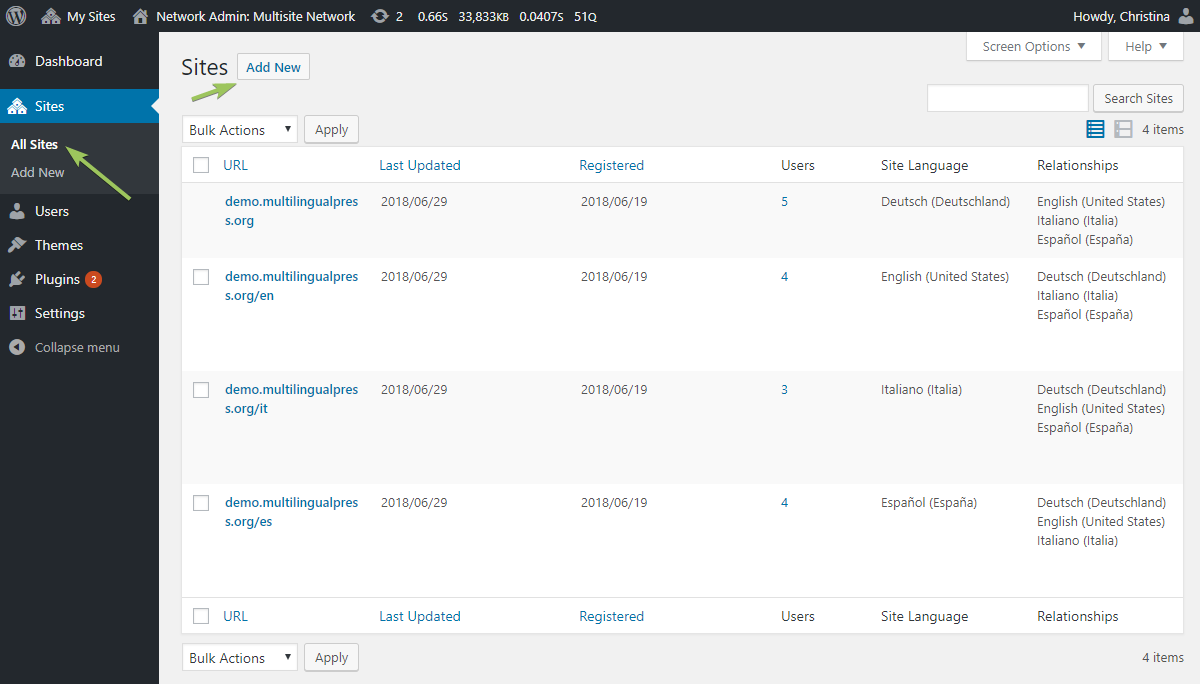
- Go to My Sites → Network Admin → Sites and click on the button Add New.
Add a new website to the network - On the settings page that appears, enter the following information in the upper section:
- Site Address (URL)– the URL of your new website
- Site Title – This will be displayed in the Admin menu and potentially on the frontend as well
- Site Language – In this case, this is the backend language for the site, the language for translation will appear further down
- Admin Email – the email of the site admin
These are all settings of the WordPress multisite that are available without MultilingualPress.

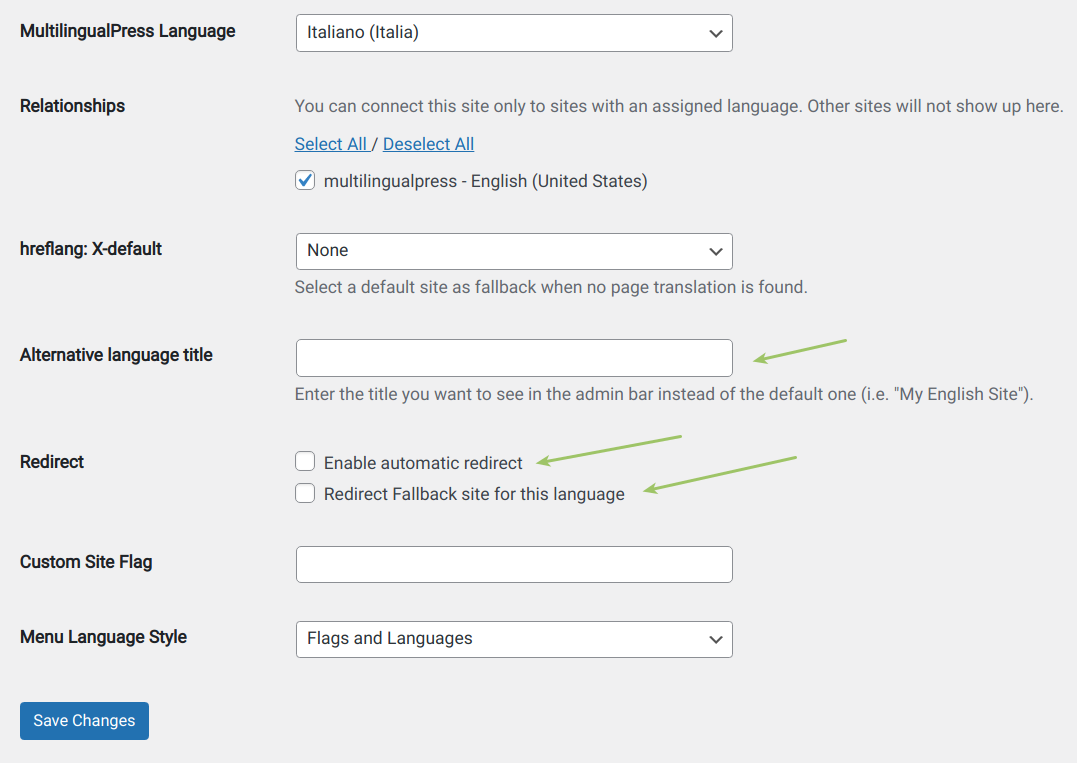
Add a new website to the network: the general settings of WordPress multisite - There is an area with information for MultilingualPress. You can change most of these settings later by going to My Sites → Network Admin → Sites, editing the site of your choice,and accessing the tab MultilingualPress:
- Language – This is the language selection. For instance, if the content on this website is supposed to be in French, then choose French here. MultilingualPress offers you many more languages to choose from than WordPress. This language field is not the standard WordPress locale language, for further information have a look at Do not override WordPress locale and let WordPress default setting to manage the site language at MultilingualPress release 3.9.0.
- Relationships – The websites you would like to link with this site. For every language which you would like to translate on your site, you should create a website and link them all together.
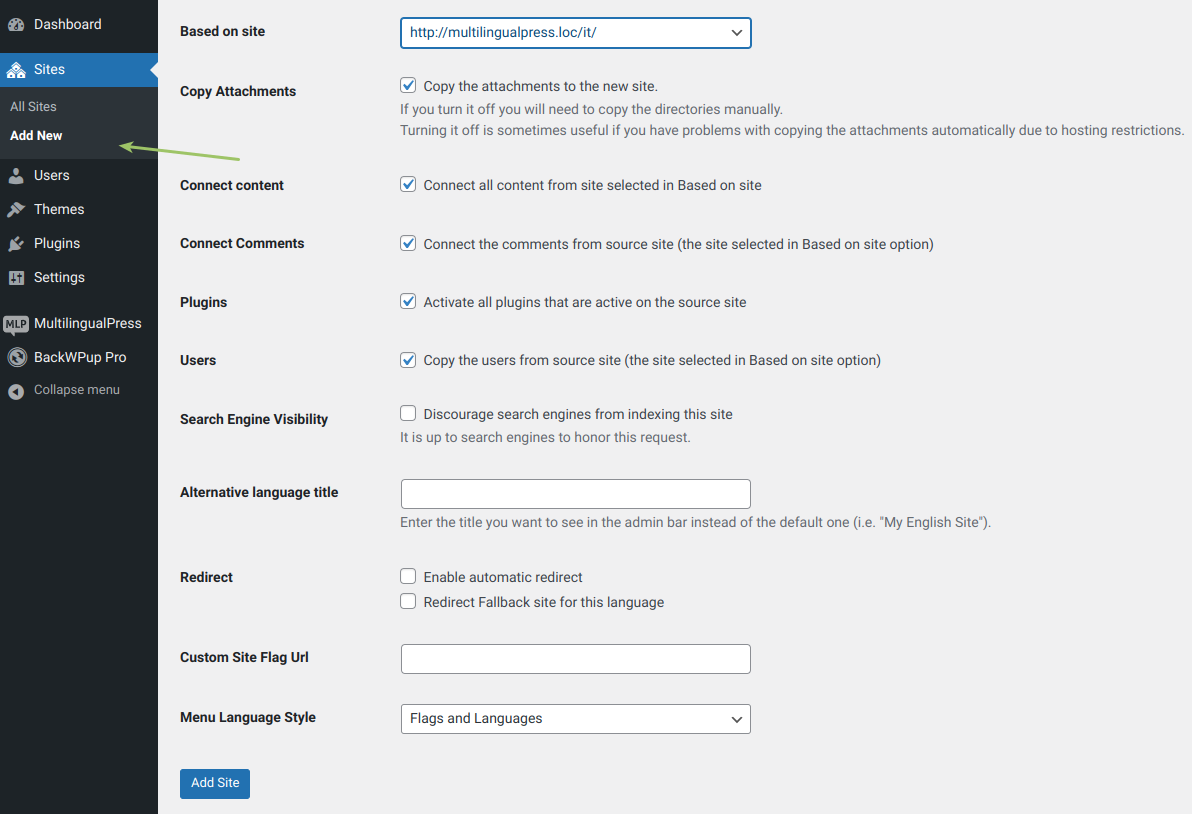
- Based on site – If you select a website here, a copy of this website will be generated when you create the new website, saving you lots of work in configuring and creating content.
- Copy Attachments – If the option is checked all the attachments of the source site will be copied in the destination site. Sometimes, due to hosting restrictions, this process cannot be performed or takes too much time to be properly accomplished. In that case if you do not check the option the attachments will not be automatically copied: instead this could be manually done after the duplication process is executed.
- Connect content – If this option is checked the new site will have all the content connected with the source site; by default the checkbox is checked so all content will be connected.
- Connect comments – If the option is checked, the new site will have all the comments connected with the source site; for further information check MultilingualPress Comments support.
- Plugins – Check the box here to activate all plugins on the new website that are active on the source website.
- Users –Check the box here to copy all the users on the source website to the new website.
- Search Engine Visibility – As usual for WordPress, you can check the box here to prevent search engines from indexing the site.
- Alternative Language Title – here you can set a title for your website that will be displayed in the Admin menu instead of the title indicated above. This field will only be displayed if you activate the module Alternative language title in the global settings of MultilingualPress.
- Redirect –Check these boxes to activate the automatic language forwarding. These fields will only be displayed if you activate the module Redirect in the global settings of MultilingualPress. Select the option you need, in order to enable the redirection for this site and/or to select this site as a root language fallback site (see the previous section for further information).
Settings – Add a new site
Translate and link content with MultilingualPress
After lots of preparation, we have arrived at the most important feature of MultilingualPress: translating posts and linking translations together. We make a distinction between translating content types (posts, pages, sites, products etc.) and translating taxonomies (categories, tags etc.).
Translating sites and posts
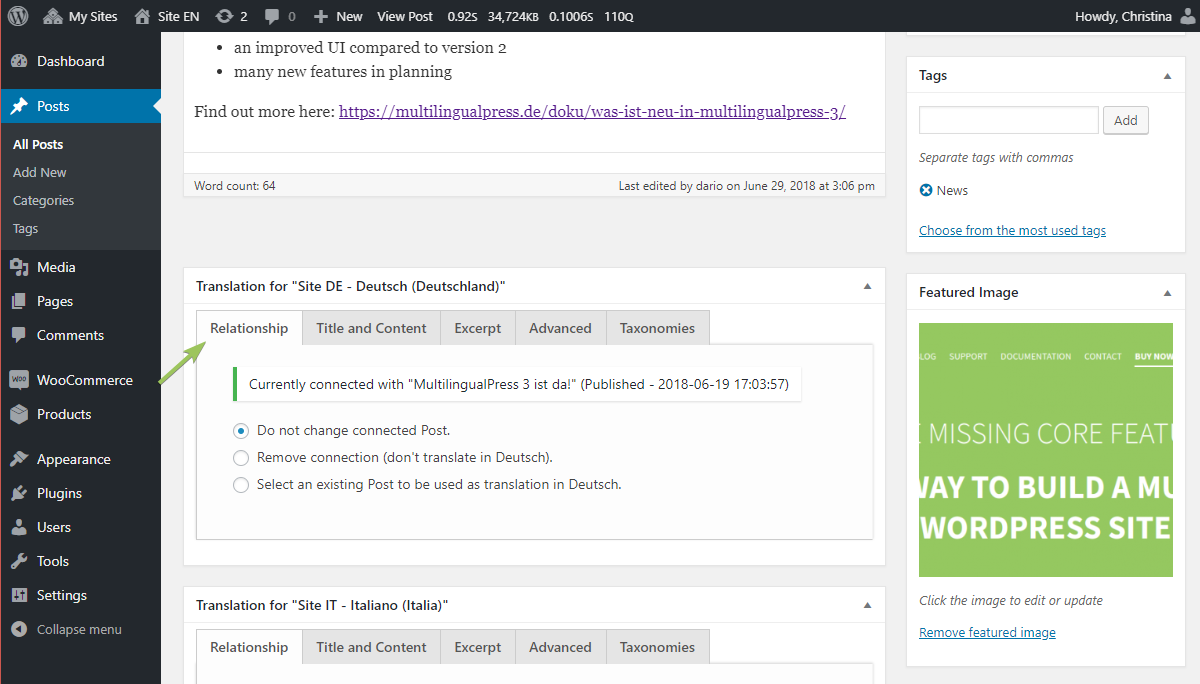
Please edit this in one of the sites to translate a post.. Enter your heading, URL and text as normal for this site. Below the editor you will find the MultilingualPress meta boxes to translate the post into other languages, one meta box per language. The meta box includes the following tabs: Relationship, Title and Content, Excerpt, Advanced and Taxonomies. We will briefly explain all tabs here. Enter your settings for the language connection or translation in the tabs and then save the post.
- Relationship: Here you can specify a language connection, that is, selecting which post is the translation of the post you are currently editing. You have the option of not choosing any translation, creating a new post or setting an existing post as the translation. If a link already exists, you can also remove it.
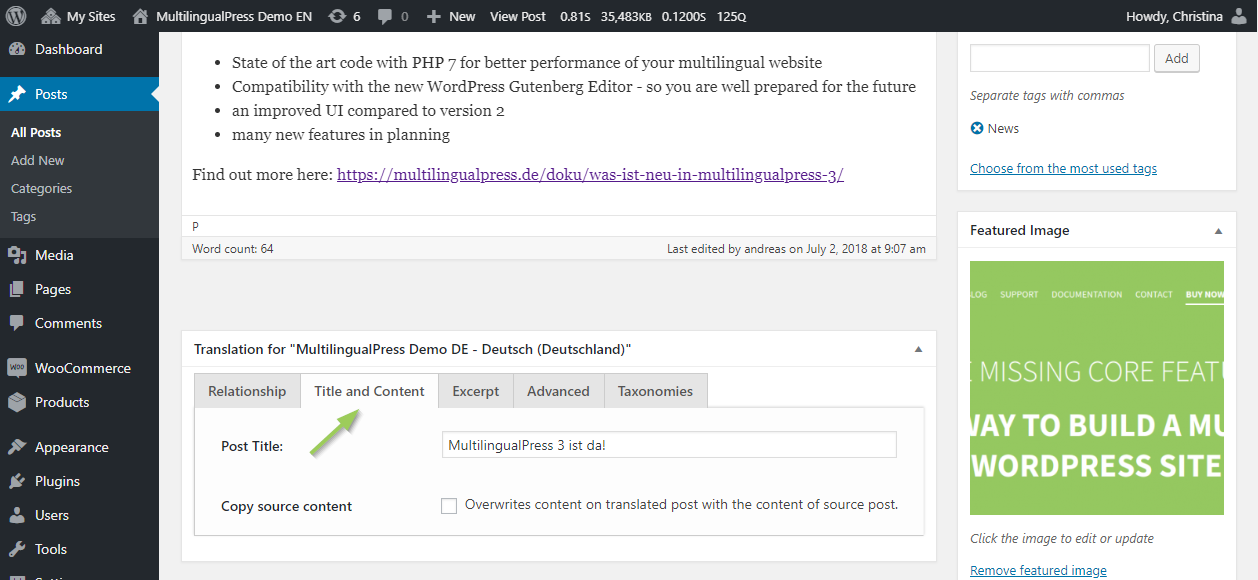
Translating a post with MultilingualPress: set language connection, i.e. link translations together. - Title and content: Here you can enter the title and content of the linked post. If you check the box next to Copy source content, this will overwrite the current content of the translation with the content in the post you are translating.
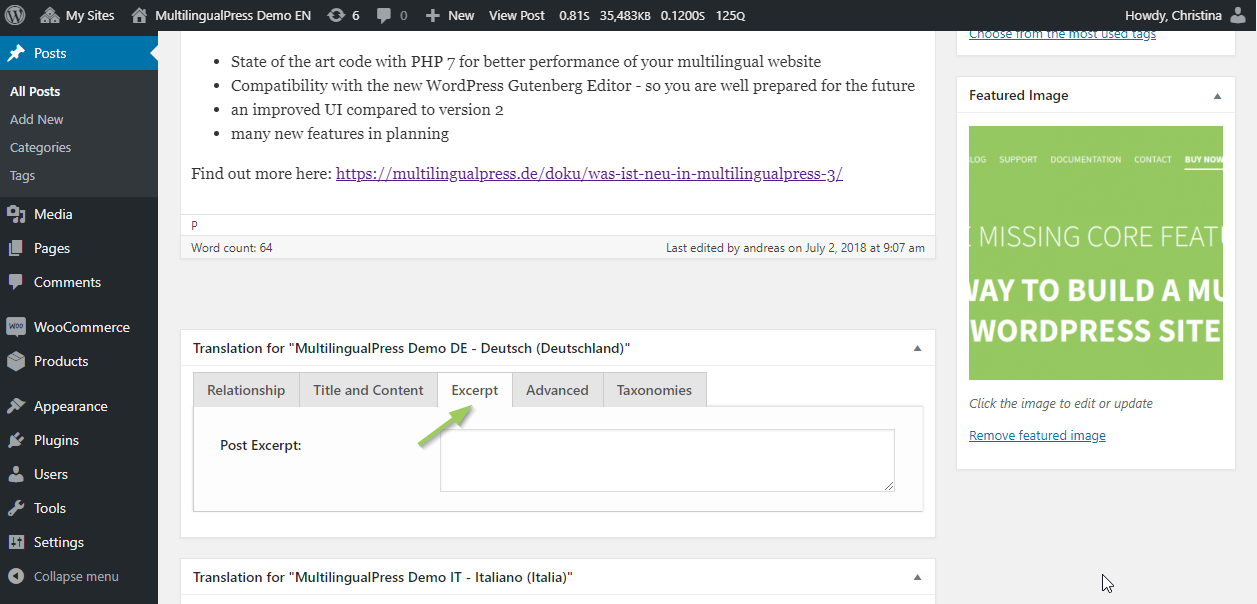
Translating a post with MultilingualPress: Enter the title and content of the translation - Excerpt: In case you want to enter an excerpt for the translation, you can do so here.
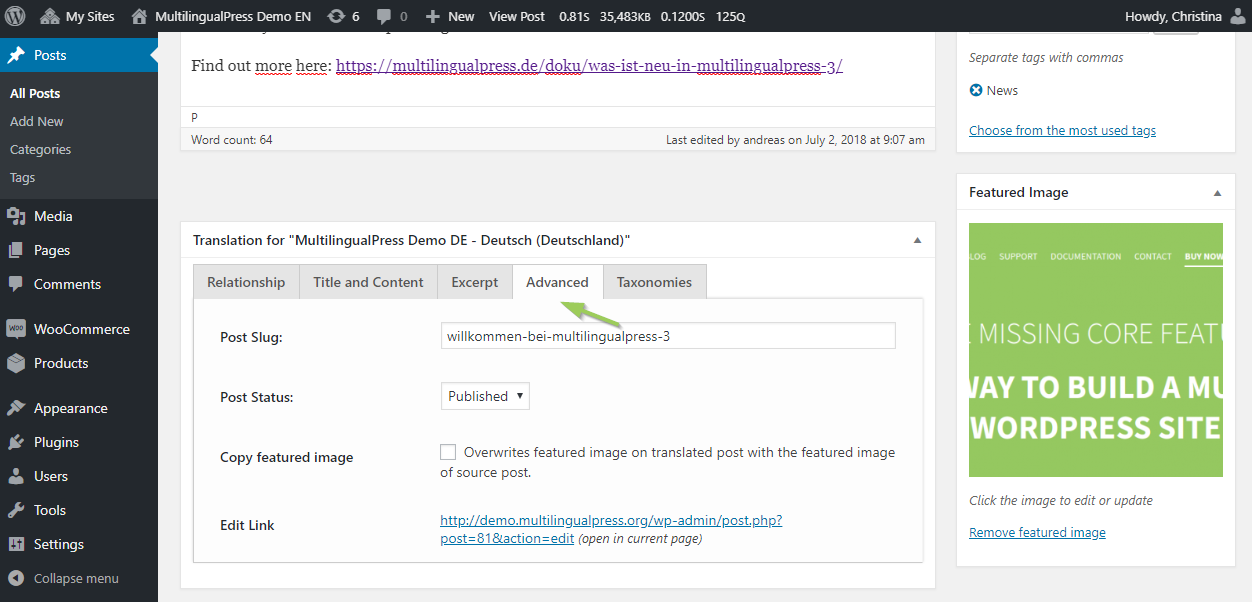
Translating a post with MultilingualPress: Enter an excerpt for the translation - Advanced: In this tab you can specify the URL (Post Slug) and status (published, draft, pending) of the translation. You also have the option of copying the picture from the original post into the translation. At the bottom, you will find a link that will take you to Edit mode for the translation. Clicking the link opens the linked post for editing. To translate the actual content please switch to the connected post using this link in the editor.
Translating a post with MultilingualPress: The Advanced tab with Slug, Post status, Post image and Link to editor for translation - Taxonomies: Here you can specify taxonomies (e.g. categories, tags) for the translation. Synchronize taxonomies overwrites all existing taxonomies in the translation with those from the source post.
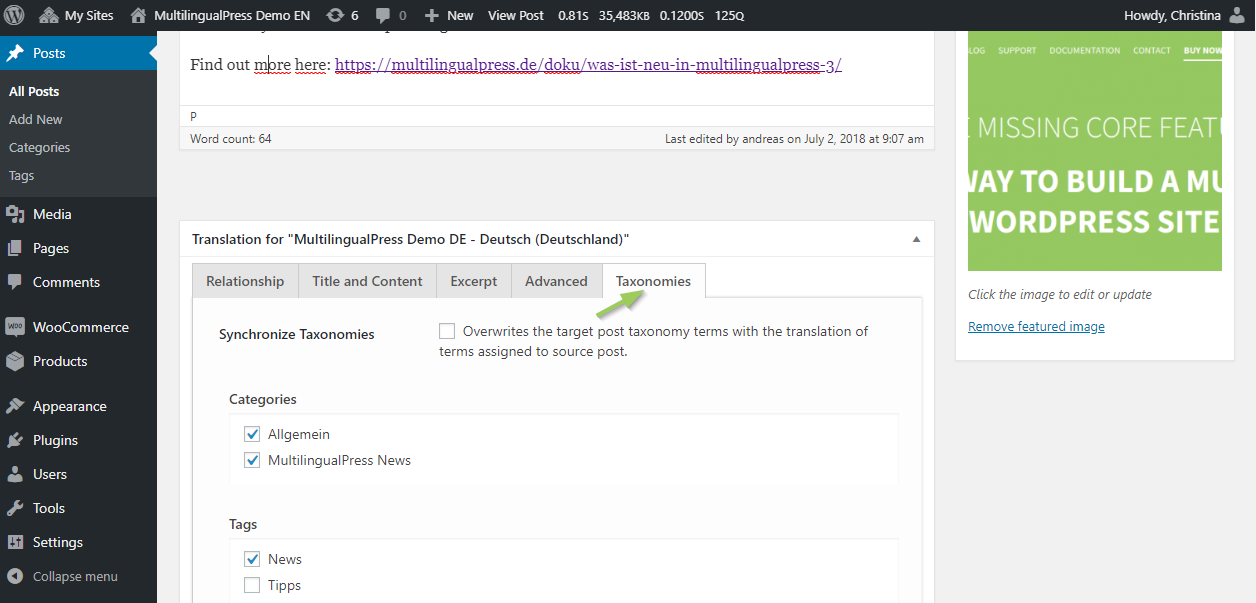
Translating a post with MultilingualPress: Specifying taxonomies
Translating taxonomies
Taxonomies categorize or group together content in WordPress. The standard taxonomies are categories and tags. There are also so-called custom taxonomies that are supplied by plugins, for instance WooCommerce product features. The different groupings in a taxonomy are called terms. For instance, if you use the tags News and Tips for your posts, then News and Tips are terms within the taxonomy of tags. You can translate taxonomies just like you translate posts.
Enter the left backend navigation for the taxonomy of your choice to do so. Then, select the term you would like to translate. Enter the settings for the translation in the MultilingualPress meta boxes below the editor. The translation meta boxes have only two tabs, in contrast to the posts:
- Relationship: Here you can specify the language connection. This means you are connecting the terms of the individual languages together. You have the option of not choosing any translations, creating a new term or setting an existing term as the translation. If a link already exists, you can also remove it. If you create a new tag, visit the Term Data tab to define the term attributes before saving.
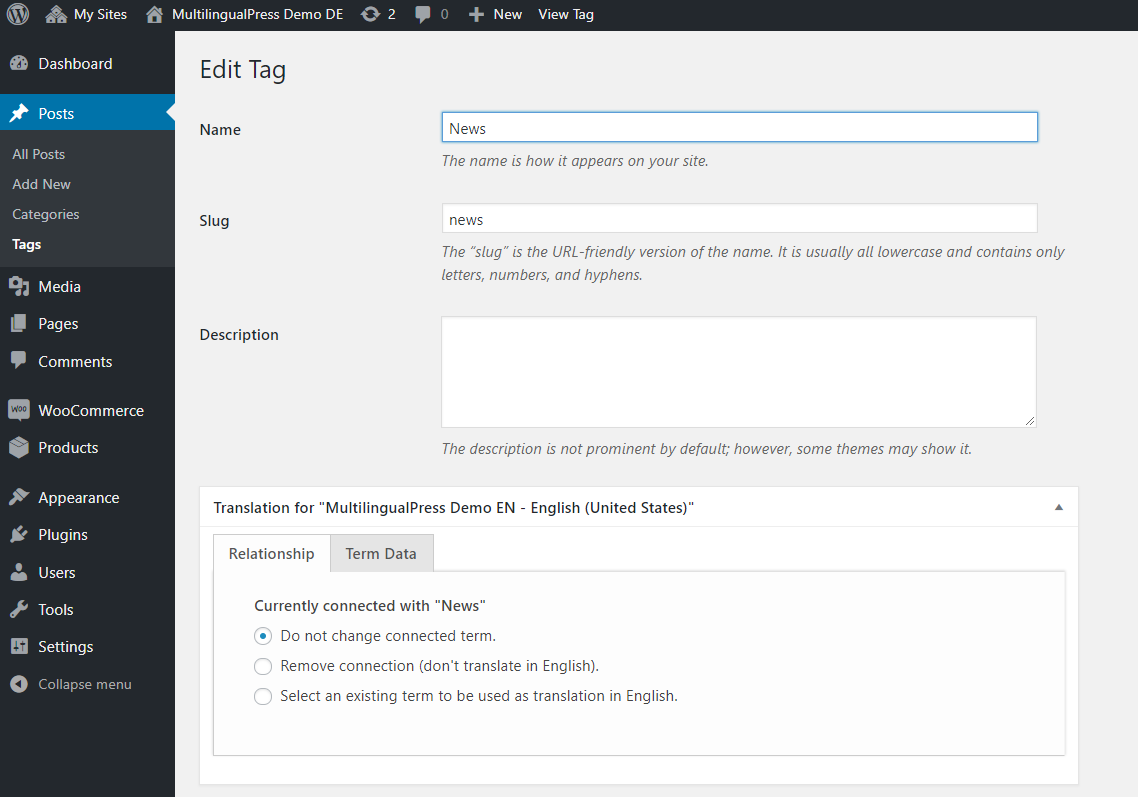
Translating WordPress taxonomies with MultilingualPress: Specifying language connection - Term data: Here you can enter the term name, term slug and a description.
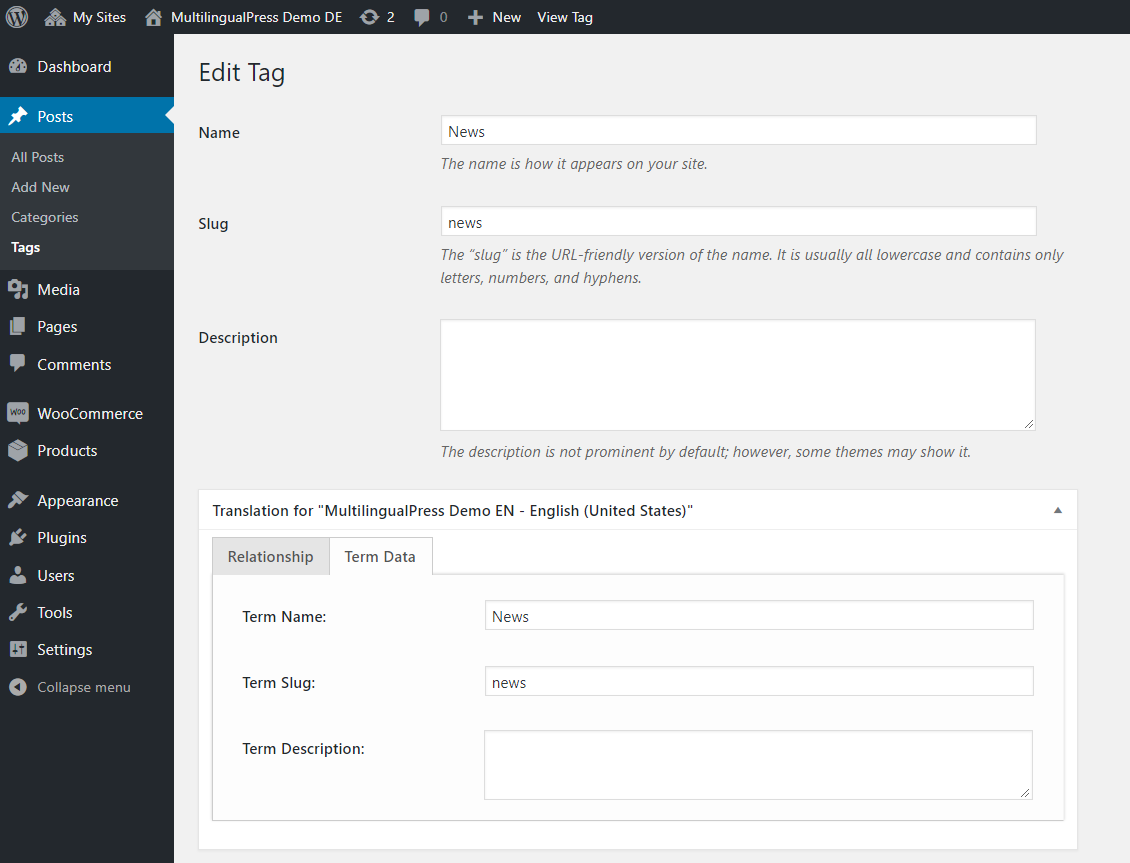
Translating WordPress taxonomies with MultilingualPress: Specifying term data
Translating WooCommerce products
Many of our customers operate multilingual shops with WooCommerce. Therefore, we would like to briefly address the topic of translating WooCommerce products. Generally, this works exactly the same as for other content types and taxonomies described above.
Important: In the global settings of MultilingualPress, choose all WooCommerce content types and taxonomies that you want to be translatable. For WooCommerce this could mean products, coupons, orders, product tags and/or product categories.
If you have set products to be translatable, then you will find the MultilingualPress meta boxes below the product editor. As usual, you can link products together, translate titles, URLs, excerpts and change any other settings as you like.
Product data tab
Compared with the previous meta boxes of translation, a new tab specification is available: “Product Data”. Through this tab is possible to set several fields and/or options to properly create or update the related remote site product. Depending on the type of product selected, Product Data tab fields update accordingly with the data available for that type of product.
Some options are specific to a particular product type, while others are present in several or all product types. First of all let’s consider the specific ones. So here is a list of the product types:
- Simple Product
- Grouped Product
- External/Affiliate Product
- Variable Product
Here follows a brief description of the specific options related to each product type that is possible to set.
Simple Product
For the Simple Product, the Regular Price and Sale Price fields are available in the metabox to save and copy prices to the related language site product.

As we see in the following pictures, files and settings in the Downloadable area in the WooCommerce product, can also be copied to the related language site product through the proper checkbox in the translation metabox.
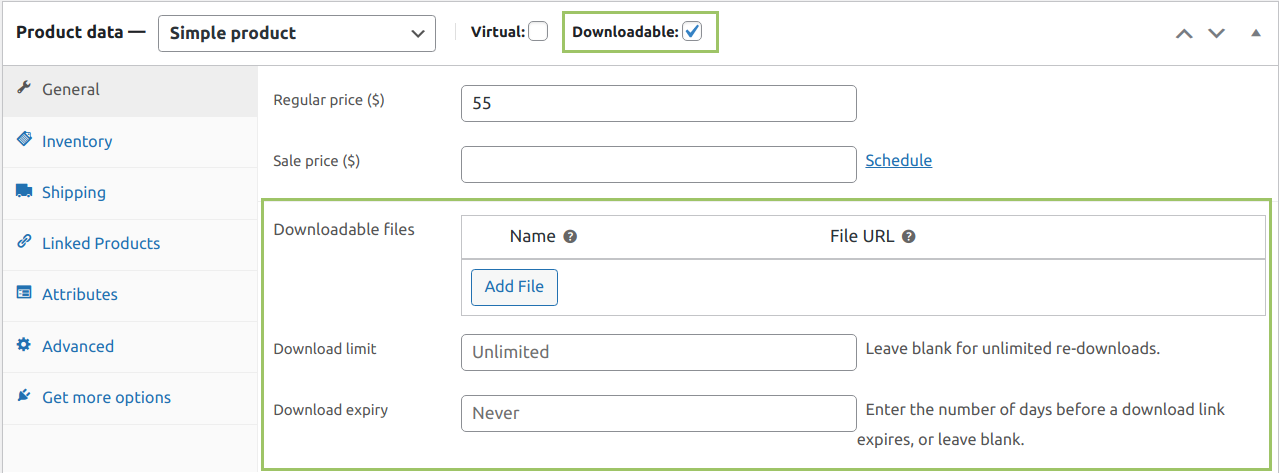
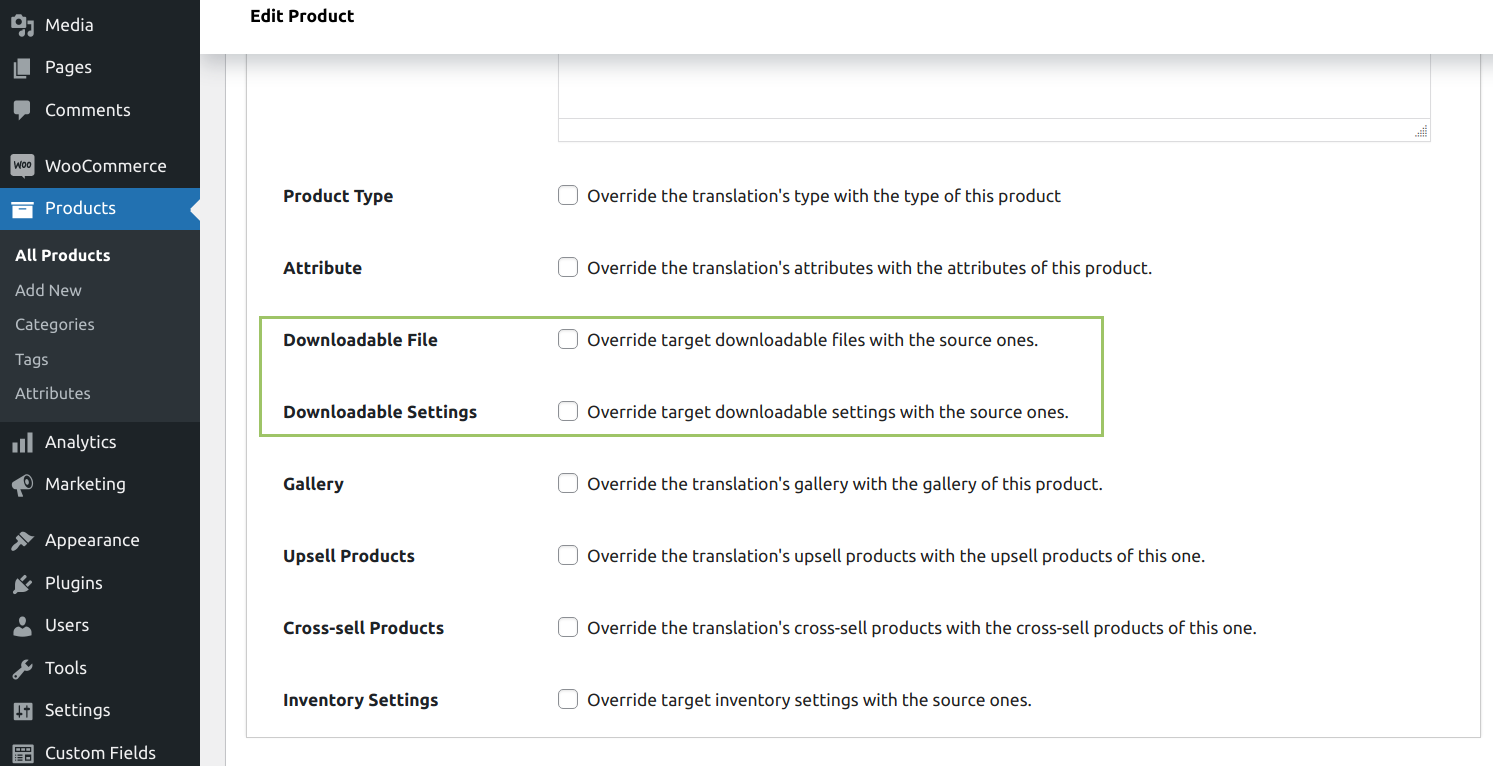
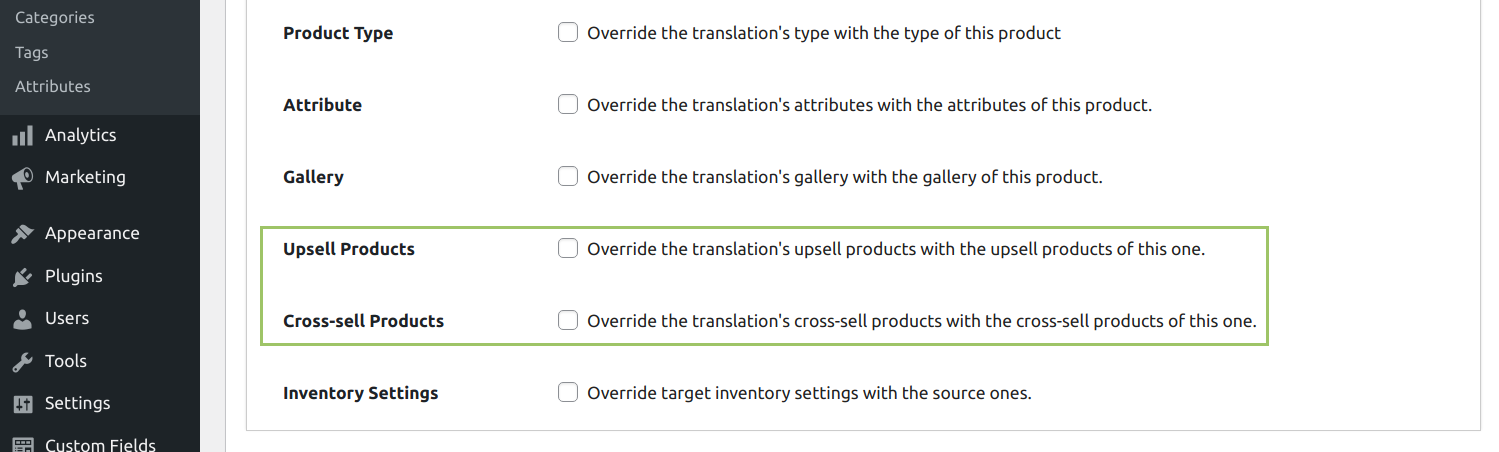
In a similar way Upsells and Cross sells products can be copied to the related product in the remote language site.
Pay attention: in order to properly use this option, the selected Upsells and Cross sells products should exist and be connected in the related destination site beforehand.
Grouped Product
When we use a Grouped Product, checkboxes of the Grouped and Upsells products in the translation metabox can be set to copy them to the related destination site product. Like the Upsell and Cross sell product in the previous paragraph, it is important to remember that the products should exist and be connected to the related destination site beforehand.
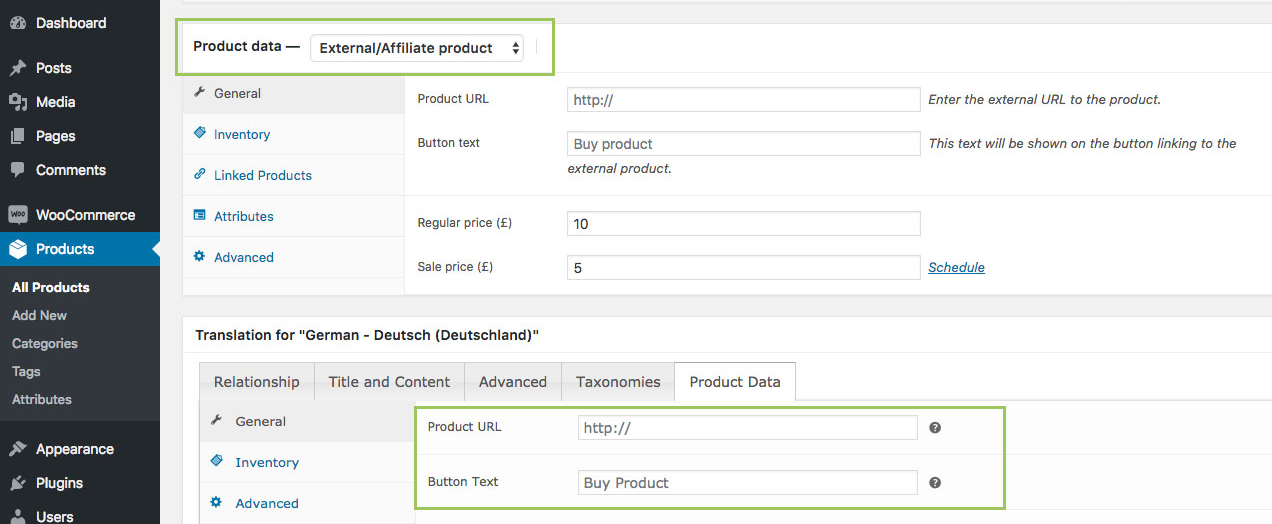
External/Affiliate Product
In case we use the External/Affiliate product type, in the product General panel, the fields Product URL and Button Text are available to copy the related values to the remote language site product.
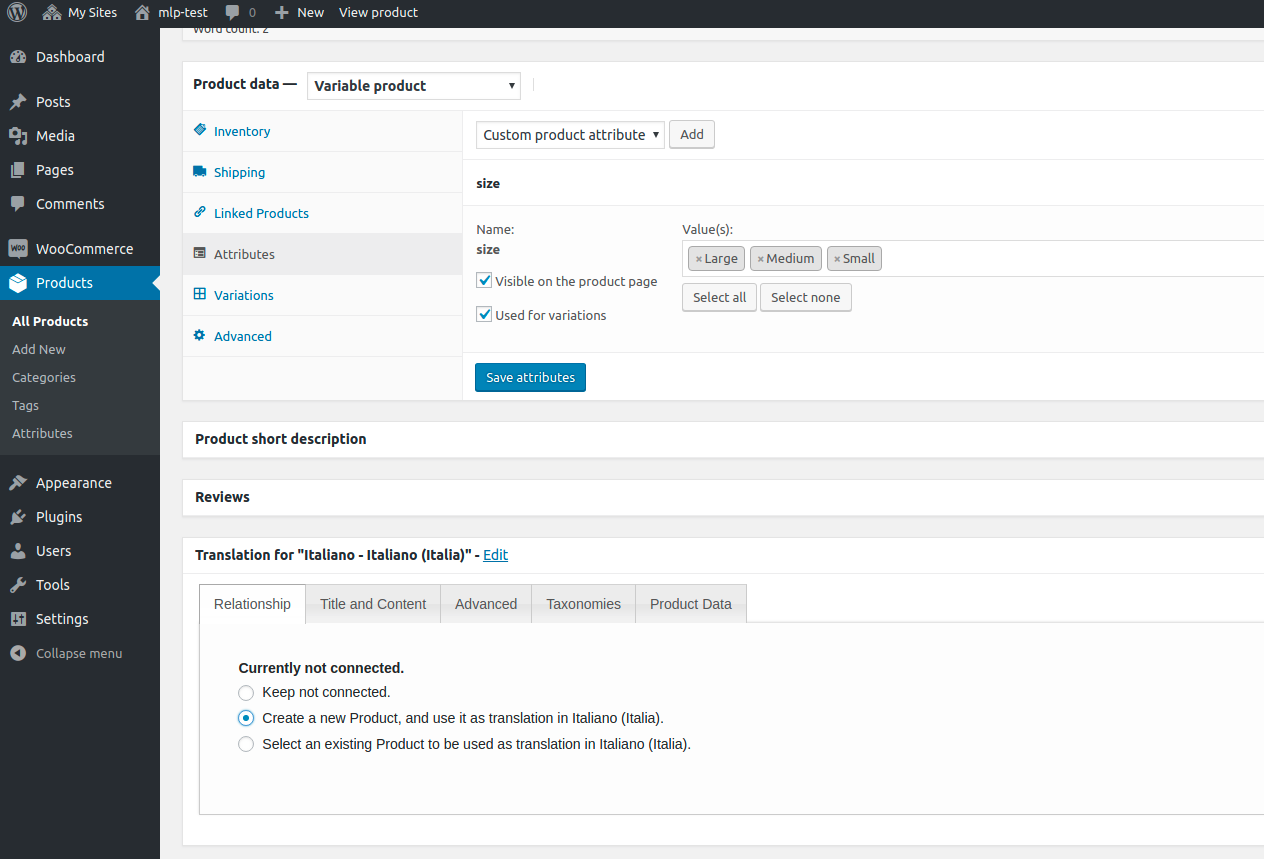
Variable Product
Finally, in case we deal with Variable Product, it is possible to copy all related data by selecting the Attribute and Variations checkboxes.
After examination of the specific options related to each product type, we are now going to take a look at the common Options shared across several product types.
Common Options
Here below the list of common options:
- Product Type: by selecting the Product Type checkbox it is possible to change the related remote language site product type
- SKU: use this field in the Inventory area to copy SKU to the related language site product
- Manage stock?: use this field in the Inventory area to enable stock management at product level
- Stock quantity: (only available if field “Manage stock?” is checked) use this field in the Inventory area to set the stock quantity for the product
- Allow backorders?: (only available if the field “Manage stock?” is checked) use this field in the Inventory area to control whether or not backorders are allowed. If enabled, stock quantity can go below 0.
- Low stock threshold: (only available if the field “Manage stock?” is checked) use this field in the Inventory area to set a product stock value that, when reached, will be notified by email.
- Sold individually: use this field in the Inventory area to only allow one of this product to be bought in a single order
- Gallery: copies the gallery images to the related language site product
- Product Short Description: lets you copy the product description to the related language site product
- Purchase Note: lets you copy the Purchase note to the related language site product
- Inventory Settings: by selecting this checkbox it is possible to override all the Inventory Settings in the related remote product with the values set in the source product
To specify additional product characteristics for other languages that are not addressed in the previous paragraphs, edit the product in the corresponding site within your multisite.
Please note: WooCommerce shops for individual versions in different languages are independent of one another and have separate shopping carts, inventory etc. MultilingualPress merely links the content together. But if you need a solution for a single stock shared by all shops in the multisite, we have another plugin that accomplishes that task: Central Stock for WooCommerce.
Forward website visitors to the right language version
How will visitors to your website access the version of your multilingual website in a language they speak and understand? There are two options for this: either automatic language redirection or selecting the language from a menu.
Automatic language redirection
Visitors to a multilingual website are forwarded to the preferred language version of the site based on the language settings in their browser with automatic language redirection. Carry out the following steps to set up this feature in MultilingualPress:
- Activating the Redirect module: My Sites → Network Admin → MultilingualPress → Modules. (see section Global settings for MultilingualPress)
- Go to My Sites → Network Admin → Sites.Edit the sites that contain your website in one language and set a language in the tab MultilingualPress.
- When you have assigned a language to every site, link them together. To do so, go to My Sites → Network Admin → Sites. Edit the sites and specify the connections in the tab MultilingualPress.
- You must also link the individual content of the sites together. You can do this in the MultilingualPress meta boxes below the editor. (see section Translate and link content with MultilingualPress)
You already completed steps 2 to 4 when translating the content.
Selecting the language from a menu
The latest version of MultilingualPress allows you to easily use a Gutengerg Menu Block to set up a language switcher menu. For more details, consult the document following this link: MultilingualPress Block Menu.
If, on the other hand, you want to create a menu manually, proceed as follows.
In this case, you create a menu for each site within your multisite that contains links to the different language versions of your content. Then, assign a location for the menu as usual in WordPress.
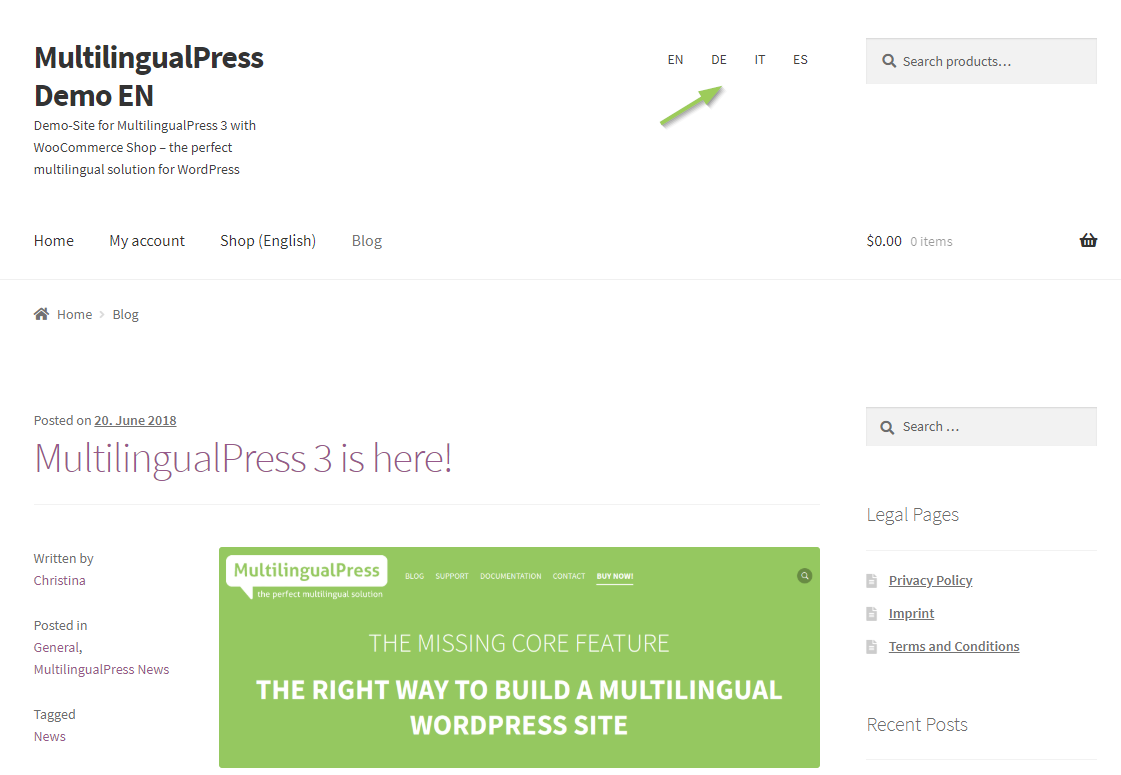
If you link translations together when translating a post, a site etc., then your visitors can switch between the different translations of the post, site etc. using this menu.
Besides, the menu creation on every subsite can be quickly accomplished using the copy navigation menu feature available in MultilingualPress. Further details can be found here.
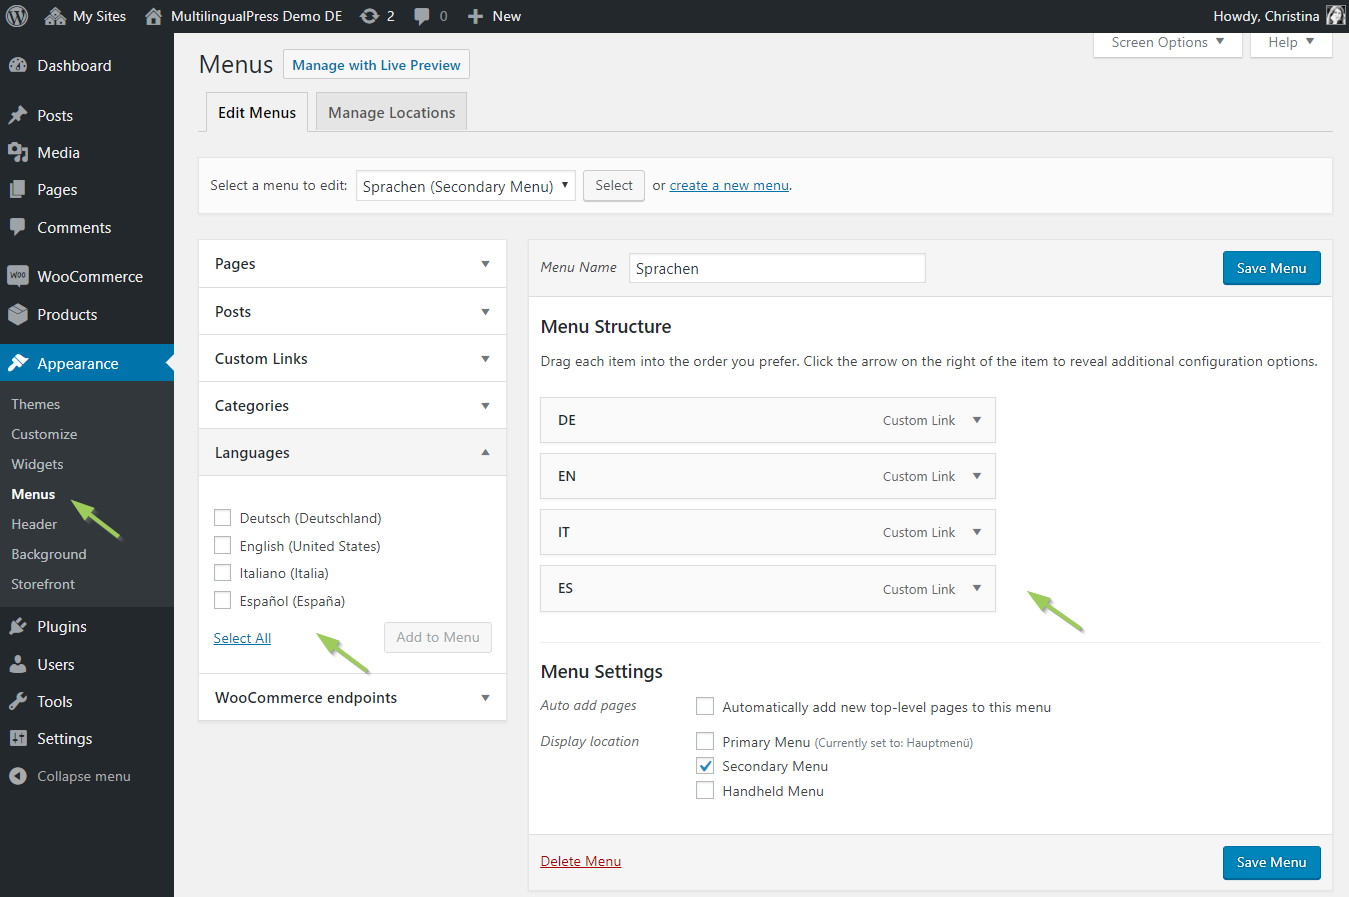
Note: If the Languages are not available when creating the menu, please click on Screen Options in the top right and check the Languages option.
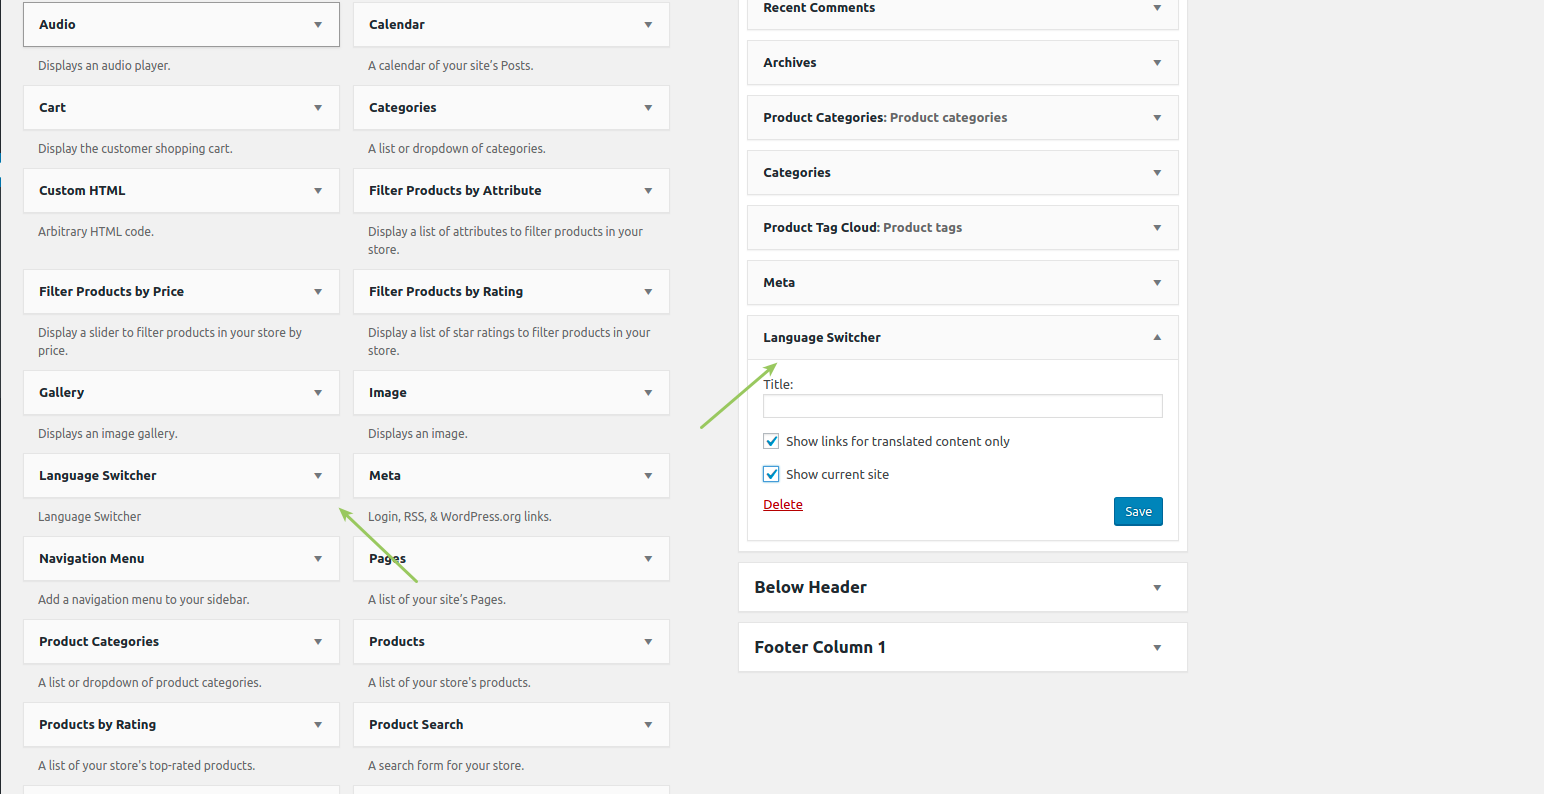
If instead, you don’t want to create a menu, you can use the MultilingualPress Language Switcher widget: this will quickly set up a language switcher in the position available in your theme. Remember to first activate the related module in the MultilingualPress Settings Module tab to access that widget.
You can also use the widget Navigation menu to display your menu in the sidebar.

Finally, consider that each element of the language menu can be rendered with the related country flag: to achieve that, just activate the MultilingualPress Site Flag module on the global settings.
Displaying hreflang and its significance for SEO
If you are operating a website professionally, it is also important for you to pay attention to search engine optimization (SEO).
For multilingual websites, you are sure to encounter the term hreflang in connection with SEO. hreflang is a link attribute (rel=”alternate” hreflang=”x”) that is displayed in the heading of a site. It signals to the search engine that the website is multilingual. This also indicates the language the currently displayed content is written and in which other languages it is available, as well as precisely where.
If you implement hreflang incorrectly on your multilingual website, this could cause major problems. This includes the dreaded duplicate content, or search engines showing the wrong language version in search results.
MultilingualPress automatically displays hreflang correctly for you once you have linked the translations together. See section Translate and link content with MultilingualPress. You can find detailed information about hreflang in the document: What is hreflang and how to use it in MultilingualPress.
